
How to bulk generate PDFs in Google Docs: Legal Notices, Letters & Billing Statements

To bulk generate printable PDFs in Google Docs, organize your spreadsheet data and run the Easy Mail Merge add-on — it automatically creates personalized letters, notices, or statements without manual copy-pasting. Below you’ll find 3 real-world scenarios with free templates: rent increase notices, billing statements, and legal demand notices.
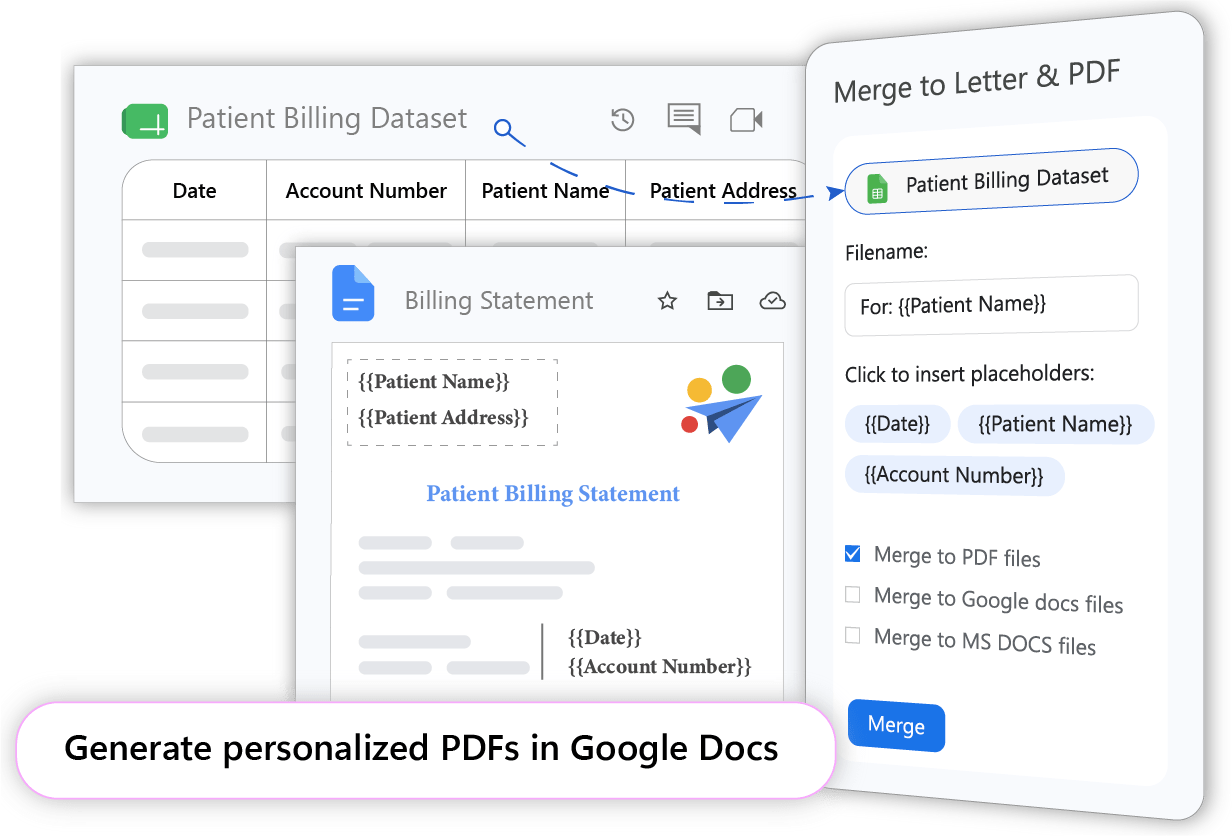
Summary: Generating PDFs for postal mail
| Use Case | Primary Document Type | Why Email Fails | Key Benefit of Easy Mail Merge |
|---|---|---|---|
| Case 1: Real Estate & Property Management | Rent Increase Notices, Lease Agreements, Eviction Notices | Tenants can claim non-receipt; housing courts require physical proof of delivery | Guarantees accurate tenant names/addresses |
| Case 2: Healthcare Practices & Clinics | Patient Statements, Payment Receipts | Unencrypted email transmission risks massive regulatory HIPAA penalties | Saves thousands on enterprise EHR suites |
| Case 3: Legal Services & Corporate Law | Demand Letters, Pre-Trial Notices, Cease & Desist | Email delivery lacks guaranteed proof of service in judicial proceedings | Automates personalized claim summaries |
Case 1: How to generate printable rent increase notices in Google Docs
Scenario:
You are an independent landlord or property manager and you need to send annual rent adjustment notices to your tenants. You can do it via email, but most states require landlords to give 30, 60, or 90 days’ written notice before raising the rent. And even in states where electronic delivery is legally permitted, local housing courts can invalidate rent increases if a tenant claims they never received the email.
Notice requirements vary by state. In California (California’s Civil Code Section 827 (opens in a new tab)), for example, a rent increase over 10% requires 90 days’ notice. In New York, the Housing Stability Act (opens in a new tab) requires at least 60 days’ written notice if your tenant has occupied the unit for more than one year but less than two years (if the increase is 5% or more). Always double-check your state and local landlord-tenant laws before sending.
To guarantee legal proof of delivery, property managers rely on printed letters delivered via First-Class Mail or handed directly to tenants.
Problem:
- Manual errors: Copy-pasting tenant names, addresses, new rental rates, and notice dates for dozens of units takes a lot of time and can easily lead to typos in your data.
- Legal penalties: Housing courts are strict. A single misspelled name or wrong effective date can invalidate the entire notice and be a common ground for dismissal.
- Expensive software: Dedicated software can cost hundreds of dollars per month, which is out of reach for many small and mid-sized property managers.
Solution:
You can generate personalized notice letters for every tenant in minutes using Easy Mail Merge.
Step 1: Organize your tenant database in Google Sheets
Set up your spreadsheet with all the dynamic fields required for your state’s notice letter.
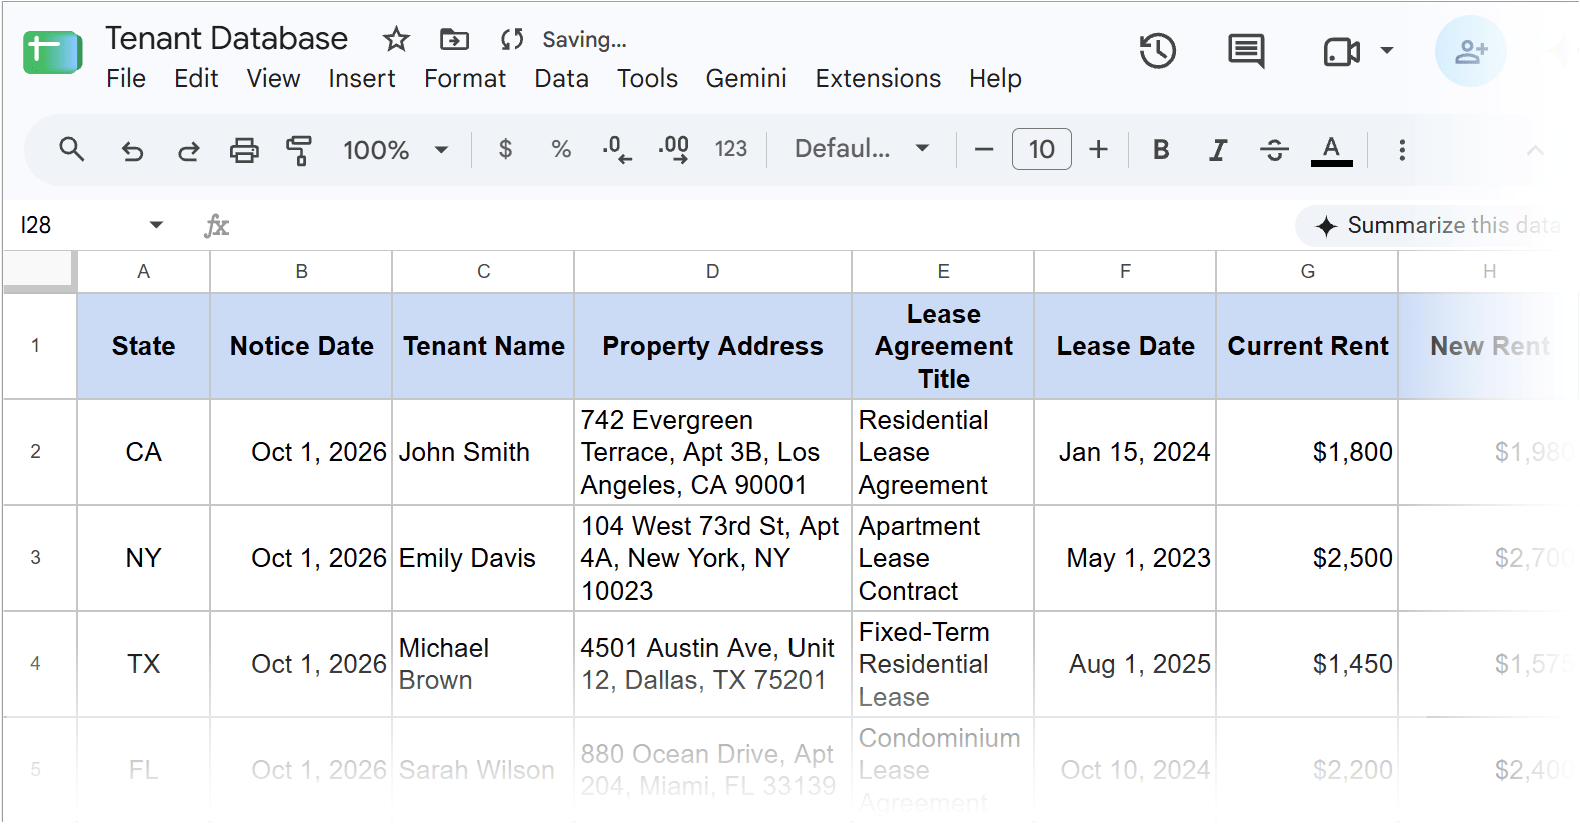
Remember that your column headers must match your template tags exactly.
Step 2: Set up your rent increase letter template in Google Docs
Create a new Google Doc and paste your legal template.
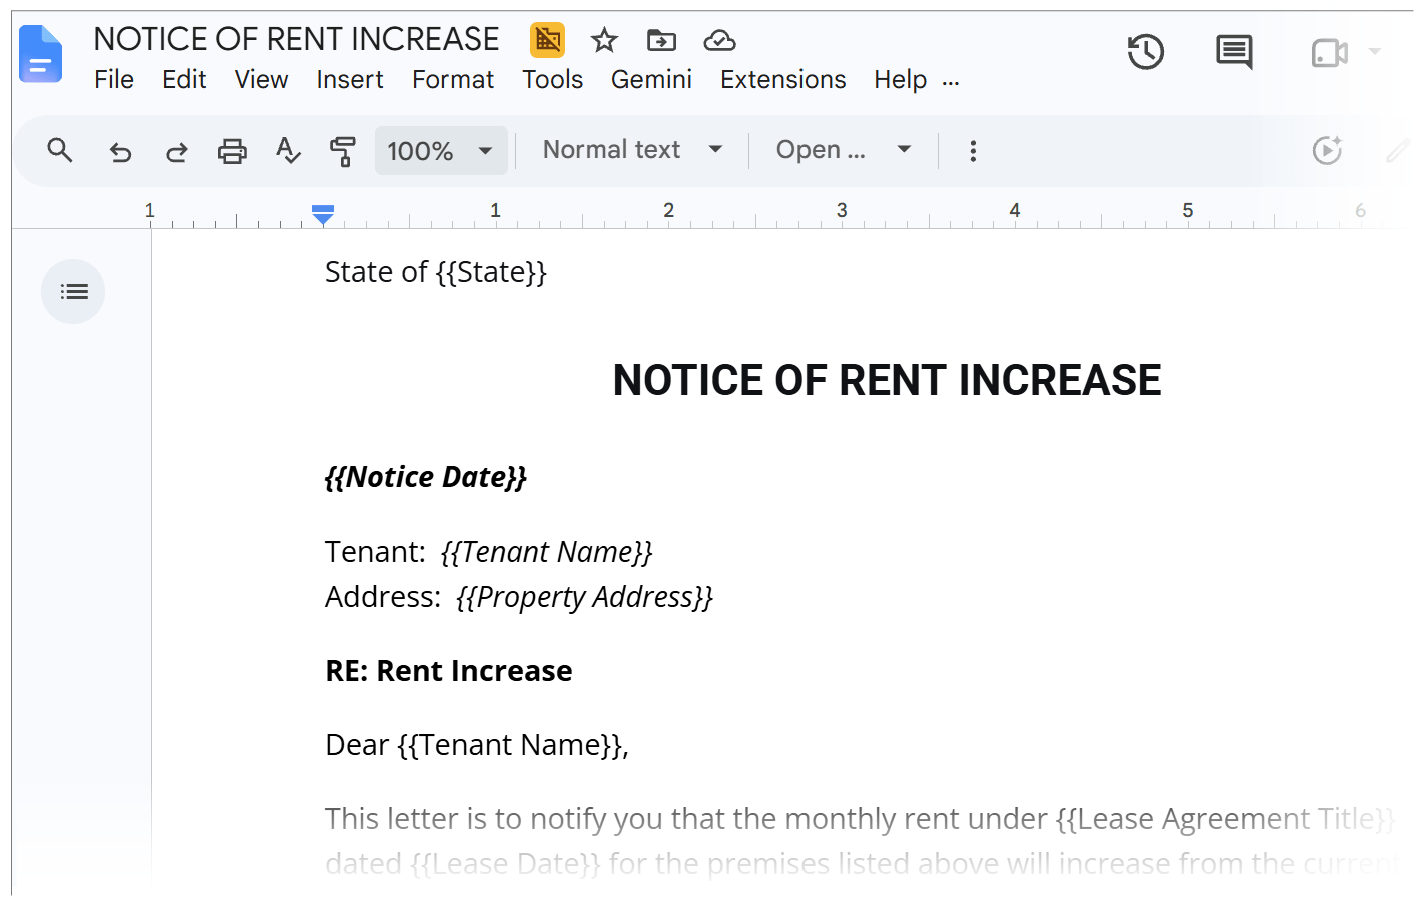
You can make a copy of this standard US rent increase letter template (opens in a new tab) via this link.
Step 3: Use Easy Mail Merge to generate personalized rent increase notices
- Open your rent increase letter template in Google Docs.
- Go to .
You can also access Merge to Letter & PDF inside Doc Tools. Simply go to , click the waffle icon (nine dots), and select Merge to Letter & PDF.
- Connect your Google Sheets spreadsheet containing your tenant records.
- Specify your naming preferences.
Use placeholders like {{Tenant Name}} or {{Property Address}} to assign recognizable titles to each document.
- Select your preferred output format like Merge to PDF files.
- Run the process by clicking Merge.
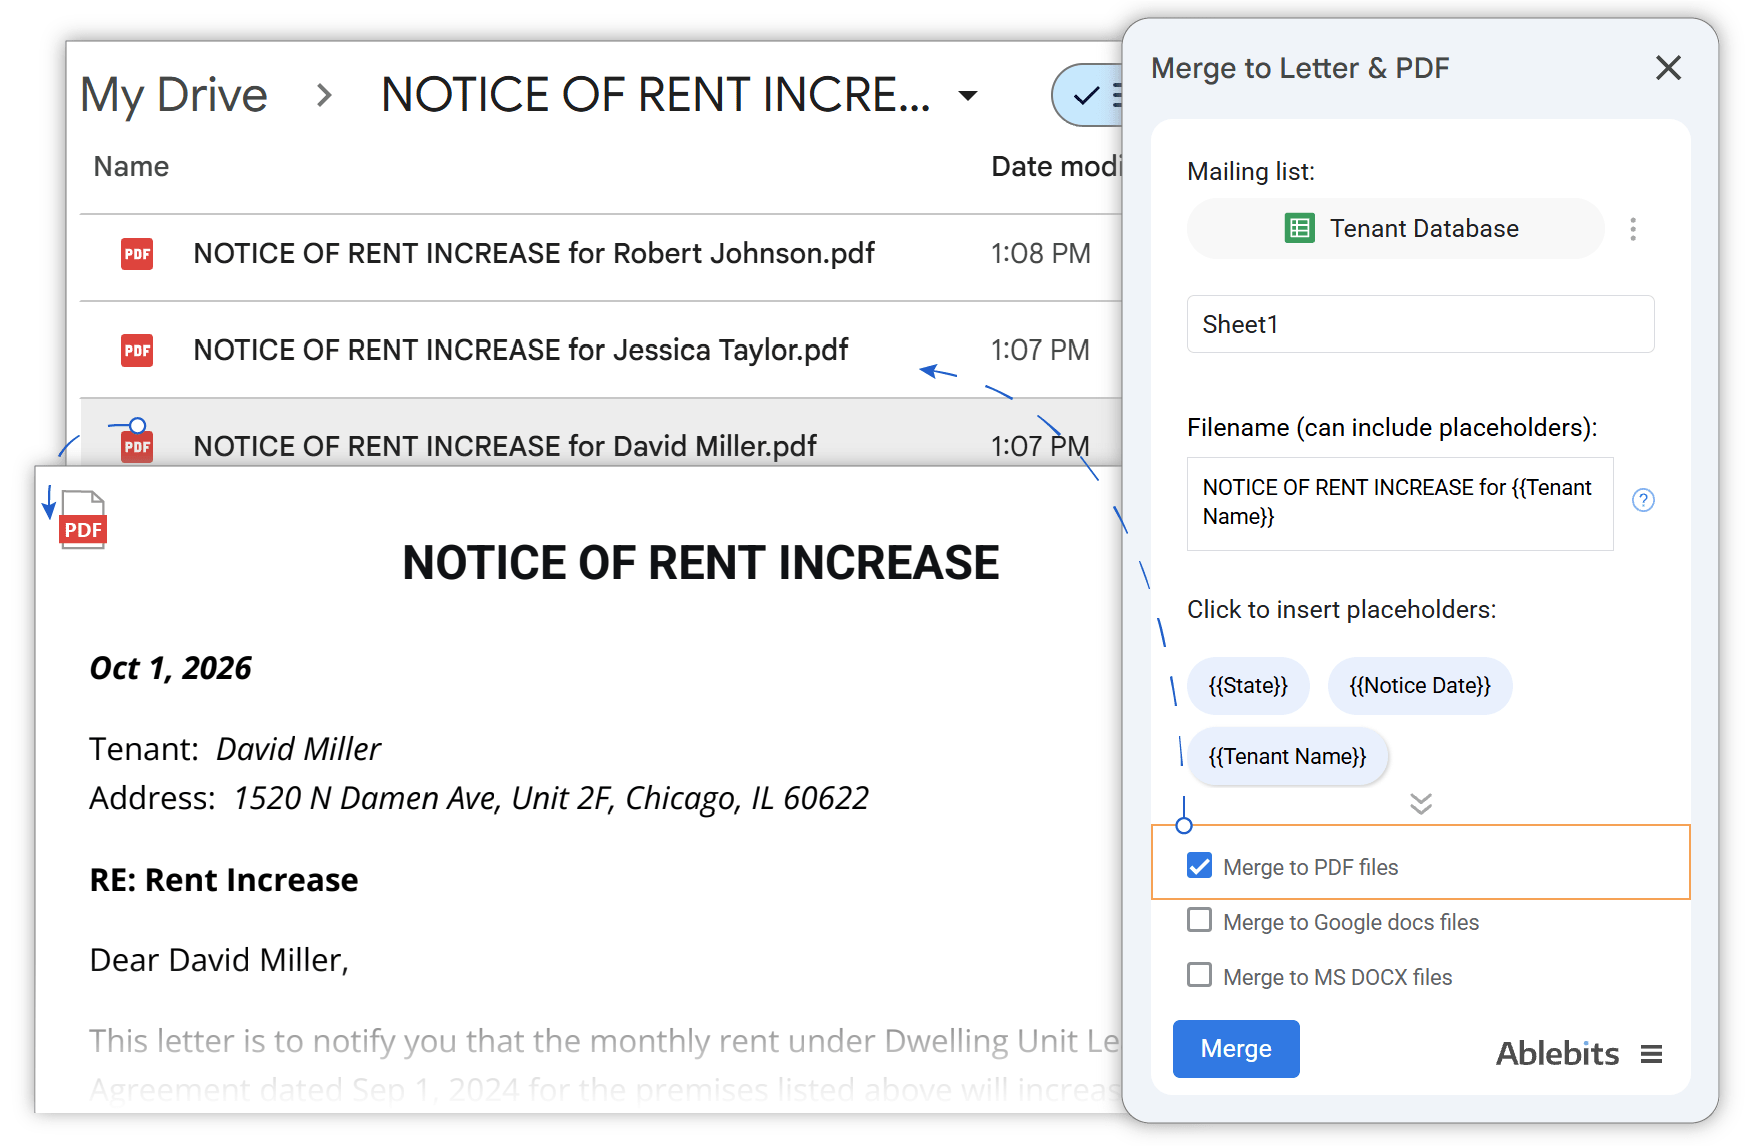
Once generated, locate your documents in the newly created Google Drive folder, download them to your computer, and print them for dispatch via First-Class Mail.
Key benefit:
With Easy Mail Merge, you eliminate human typing errors and guarantee that every generated PDF letter contains 100% accurate names, addresses, and calculated effective dates. You can also use Easy Mail Merge to generate personalized lease agreements, eviction notices, rent receipts, and other legal documents.
Case 2: How to create billing statements for postal delivery
Scenario:
You manage billing for a private medical practice, dental clinic, or therapy center, and you need to issue monthly patient statements.
While federal laws strictly regulate itemized medical bills and cost estimates, regular patient statements carry their own compliance risks. Under HIPAA (45 CFR § 164.312 (opens in a new tab)), clinics cannot email balance updates without patient opt-in or end-to-end encryption. That’s why many practices prefer to generate printed billing statements for physical dispatch.
Problem:
- HIPAA compliance risks: Sending sensitive medical details via regular unencrypted email risks massive regulatory penalties.
- High cost of specialized software: Big clinics have a patient billing system and an integrated electronic health record (EHR) system, but for small practices, full-suite EHR platforms are too expensive.
Solution:
You can export your billing summary from your practice records to Google Sheets and use Easy Mail Merge to instantly generate personalized PDF patient statements for print or archived Drive storage.
Step 1: Prepare your billing dataset in Google Sheets
Set up your spreadsheet with all the dynamic fields required for your patient statement.
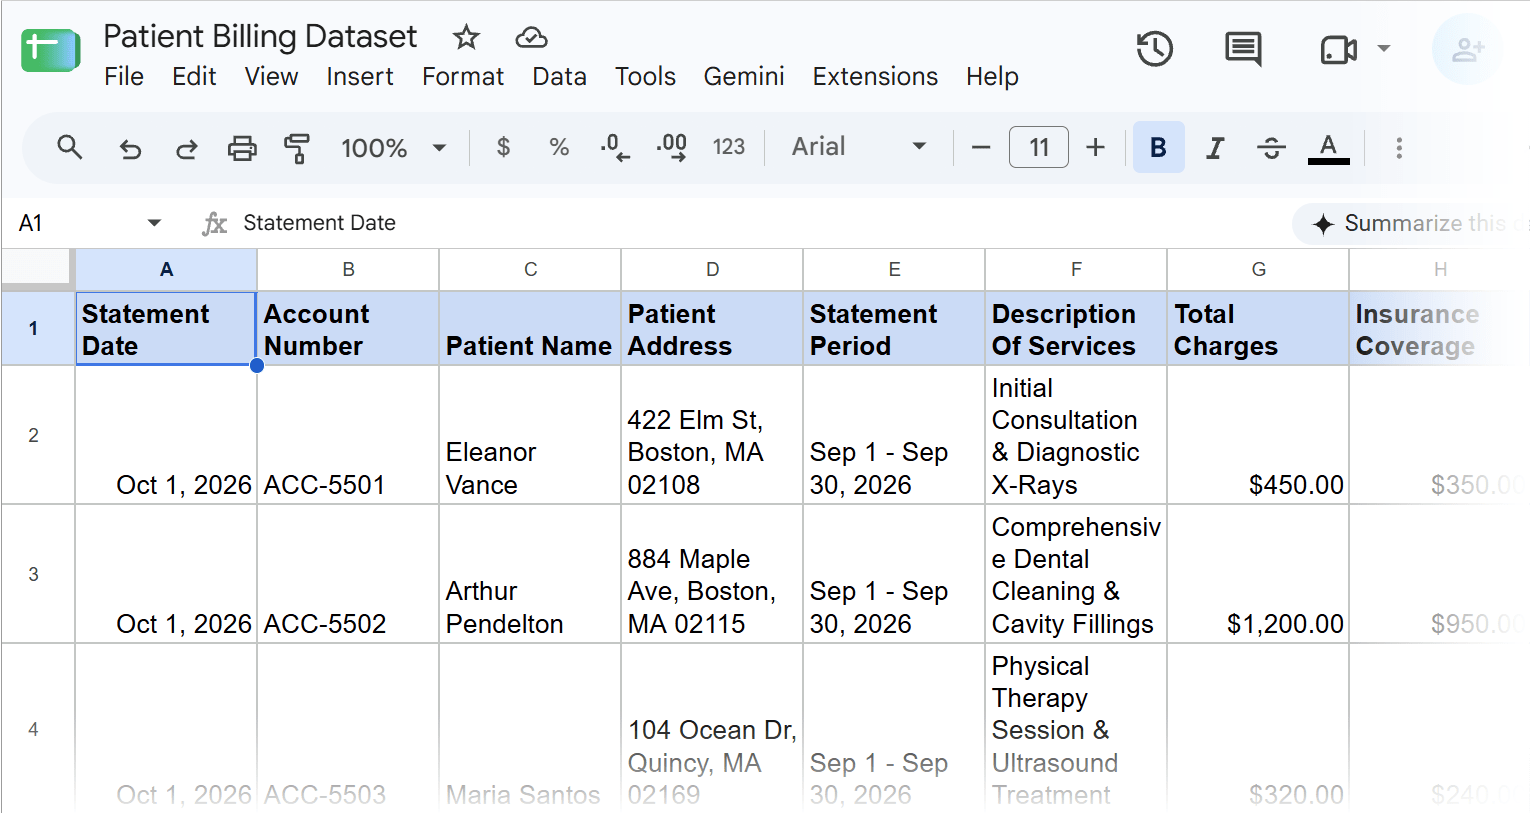
Make sure your column headers match your template tags exactly.
Step 2: Set up your patient statement template in Google Docs
Create a new Google Doc with your clinic’s letterhead, recipient address box (formatted for #10 window envelopes), and billing summary table.
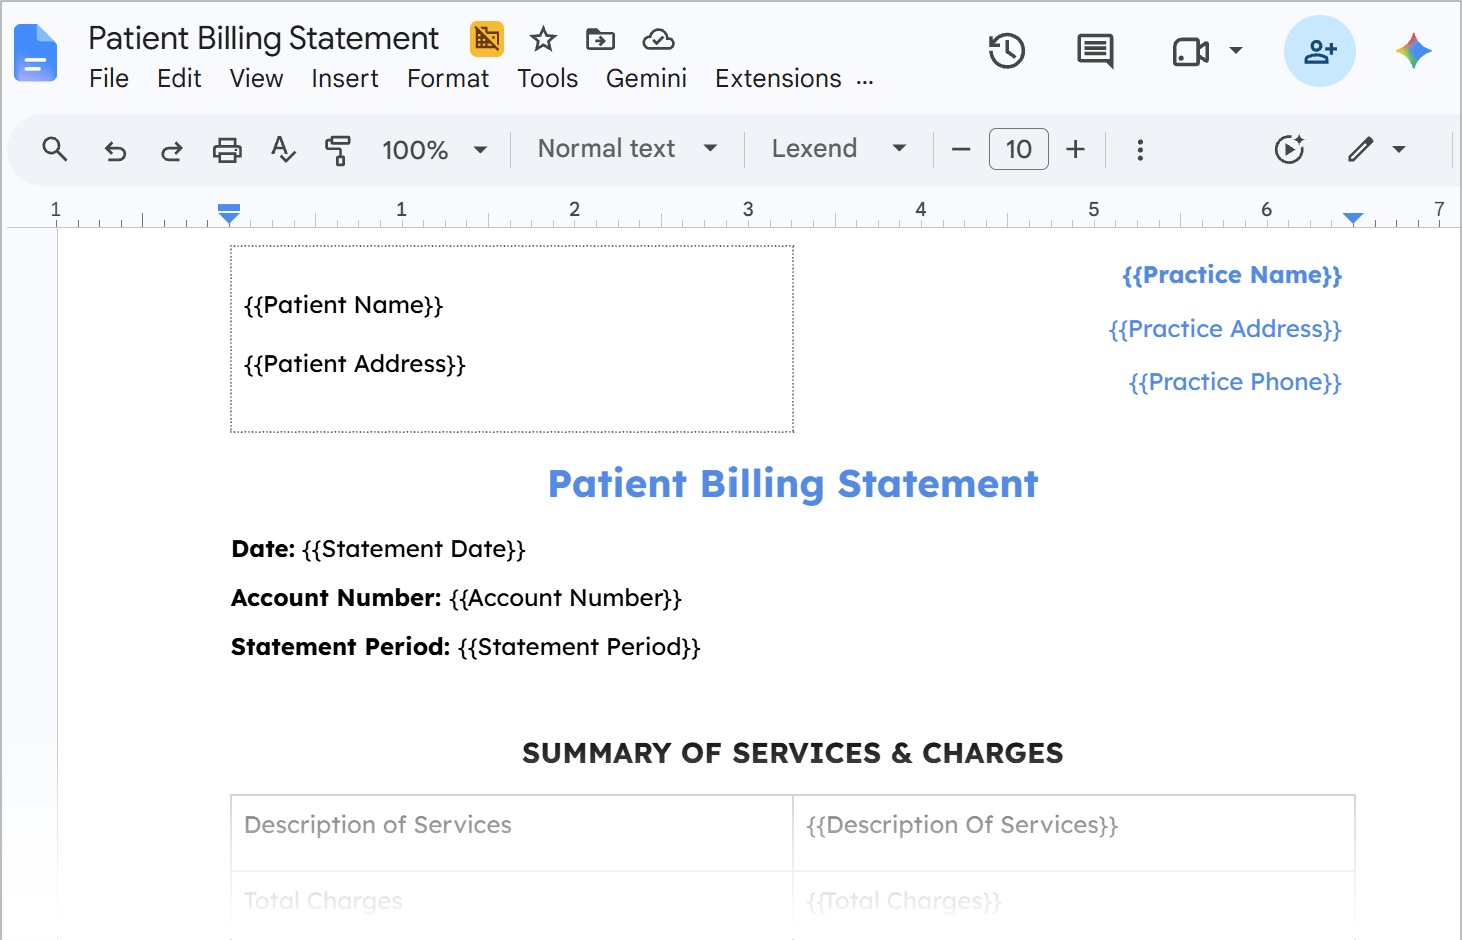
Make a copy of our free patient statement template (opens in a new tab) via this link.
If your billing statement template is in Google Sheets, read this article to learn how to generate PDFs from Google Sheets templates using Easy Mail Merge (opens in a new tab). You’ll also learn how to attach these PDFs to emails for your clients.
Step 3: Use Easy Mail Merge to generate personalized billing statements
- Open your patient statement template in Google Docs.
- Launch Easy Mail Merge via .
- Select your Google Sheets billing dataset.
- Set dynamic file names using placeholders like
{{Patient Name}}. - Choose your preferred output mode:
- Select PDFs to generate individual printable statements saved directly to a dedicated Google Drive folder.
- Select Docs or Docx if you need editable copies of each statement before printing.
- Click Merge to generate your patient statements.
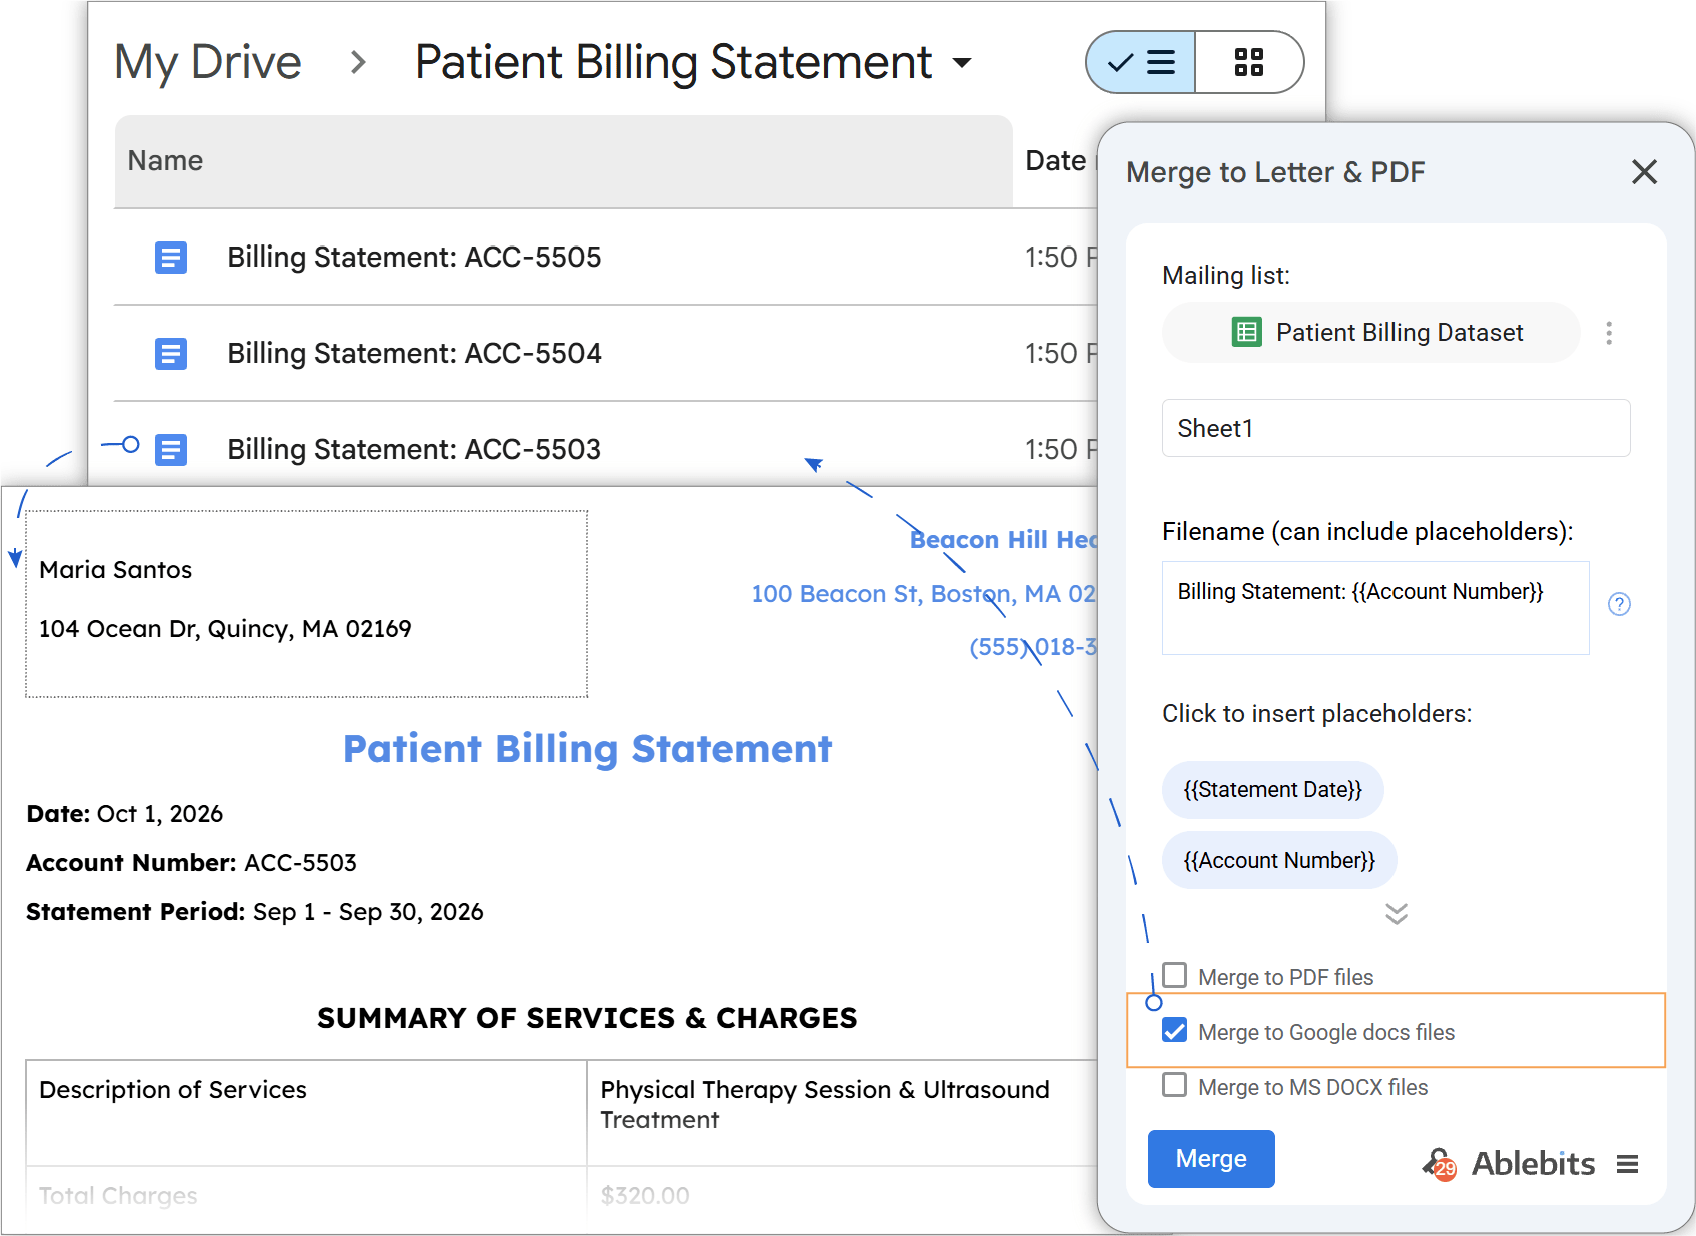
Once generated, download your statements from Google Drive, send them to your office printer, and dispatch them via First-Class Mail.
Key benefit:
With Easy Mail Merge, you can generate patient statements using your existing Google Workspace and a budget-friendly add-on, saving thousands of dollars on complex EHR billing software. You can also use Easy Mail Merge to generate personalized fee schedules, appointment reminders, and patient payment receipts.
Case 3: How to generate personalized legal notices and demand letters from Google Docs
Scenario:
You manage operations for a law firm or legal department. You need to issue legal notices to multiple recipients. Under procedural law, sending an email is often insufficient to establish legal proof of service. To satisfy court requirements, practices usually must send physical copies via standard postal mail to maintain a verifiable paper trail.
Problem:
- Manual overhead: Drafting each legal demand or notice individually in Word or Docs for dozens of clients wastes hours and increases the risk of manual copy-paste errors.
- Risk of dismissal: Missing required legal language or formatting errors on individual notices can invalidate the proof of service in court.
Solution:
You can maintain your client or debtor database in Google Sheets and use Easy Mail Merge to generate personalized legal notices in Google Docs, fully formatted for physical dispatch and archiving.
Step 1: Prepare your legal notice dataset in Google Sheets
Set up your spreadsheet with all recipient details, claim amounts, and reference numbers.
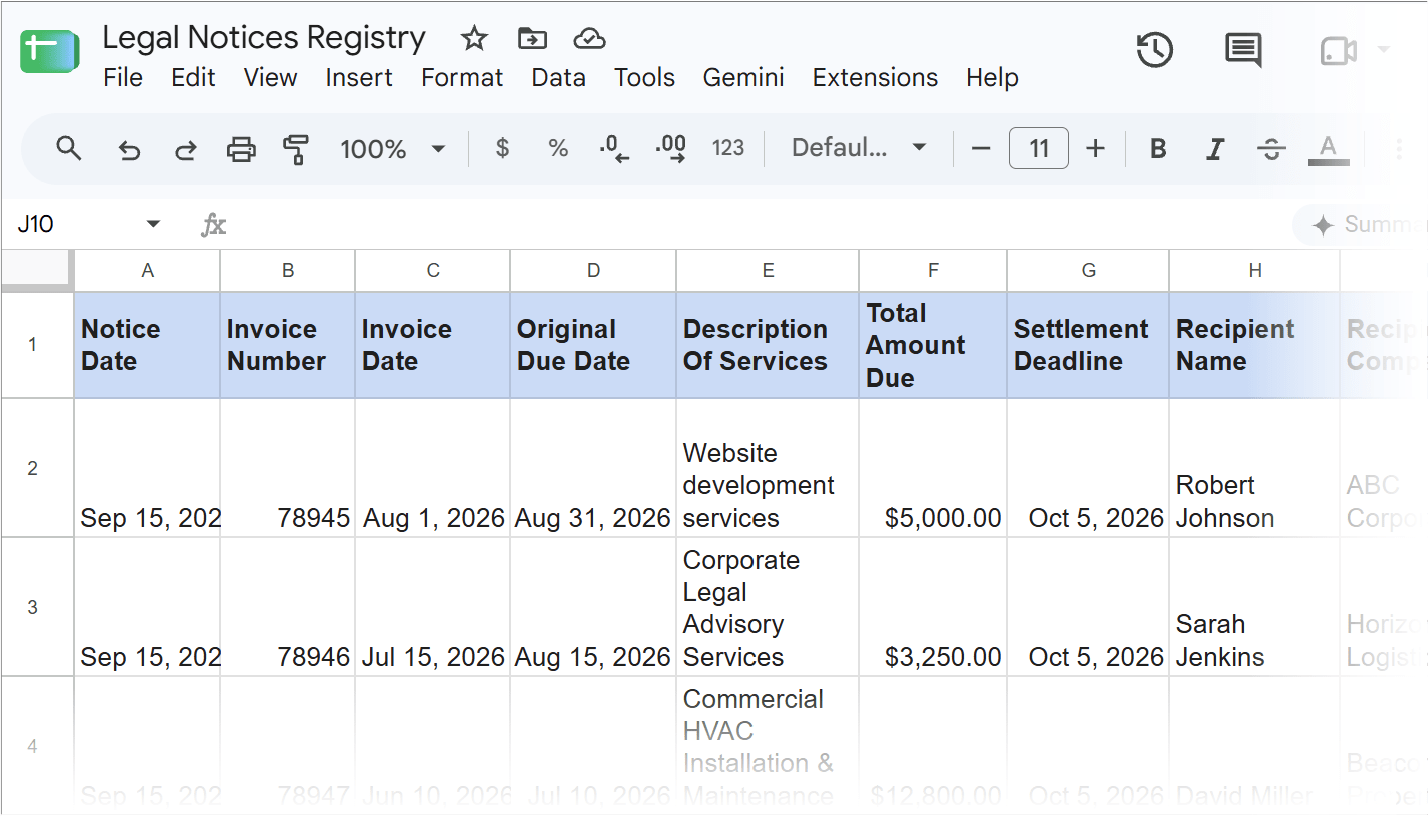
Step 2: Set up your legal notice template in Google Docs
Create a Google Doc containing your firm’s formal letterhead, recipient block, and claim summary table.
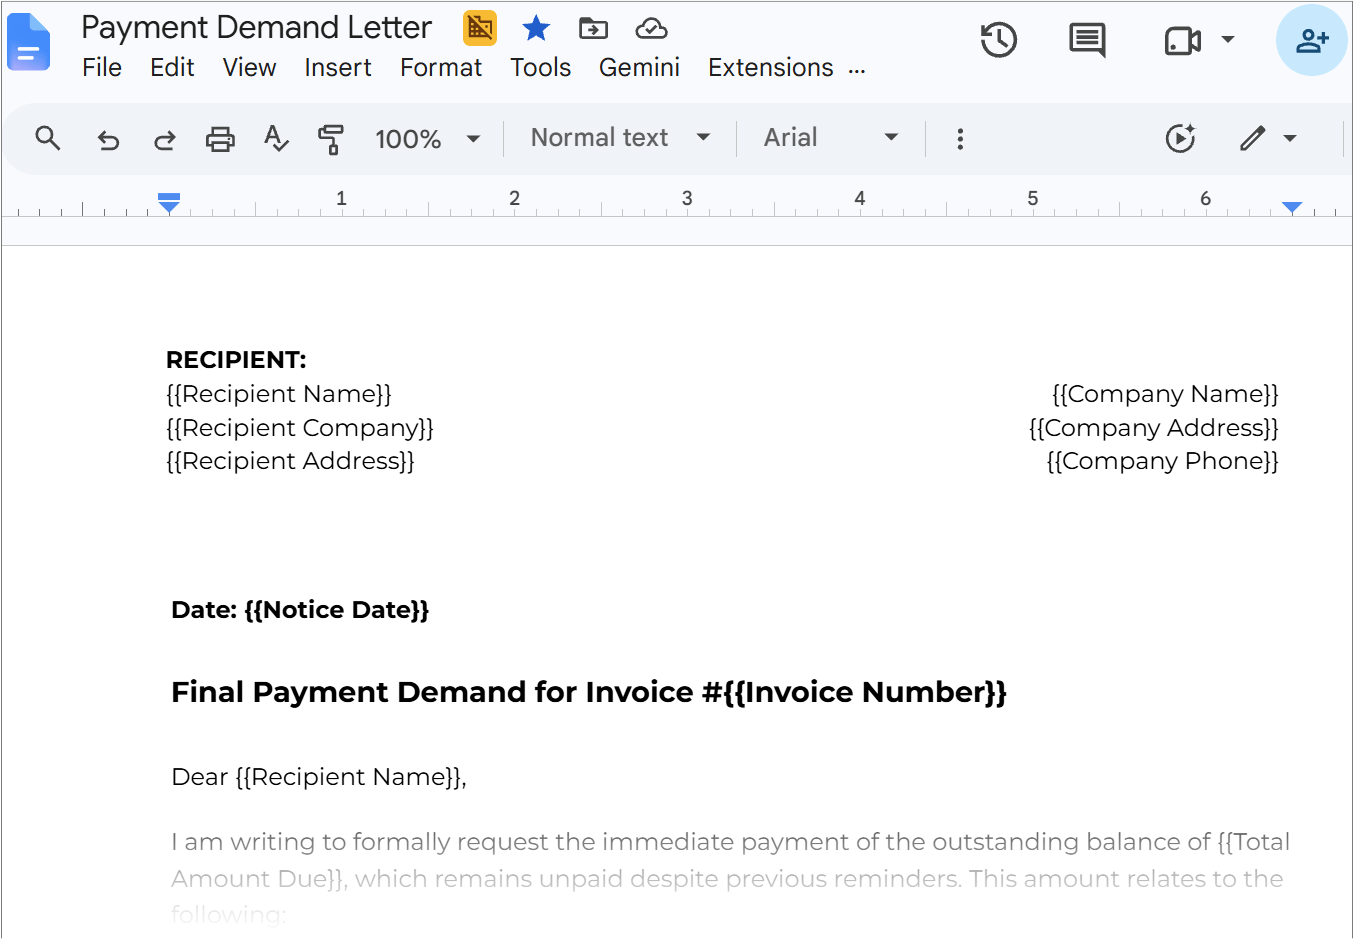
Make a copy of our free pre-trial demand notice template (opens in a new tab) via this link.
Step 3: Use Easy Mail Merge to generate personalized legal notices
- Open your legal notice template in Google Docs.
- Launch Easy Mail Merge via .
- Select your Google Sheets legal dataset.
- Set dynamic file names using placeholders like
{{Recipient Name}}. - Choose your preferred output mode:
- Select PDFs to generate individual legal notices saved to a secure Google Drive folder.
- Select Docs or Docx if specific notices require manual edits or custom legal additions prior to printing.
- Click Merge to generate your documents.
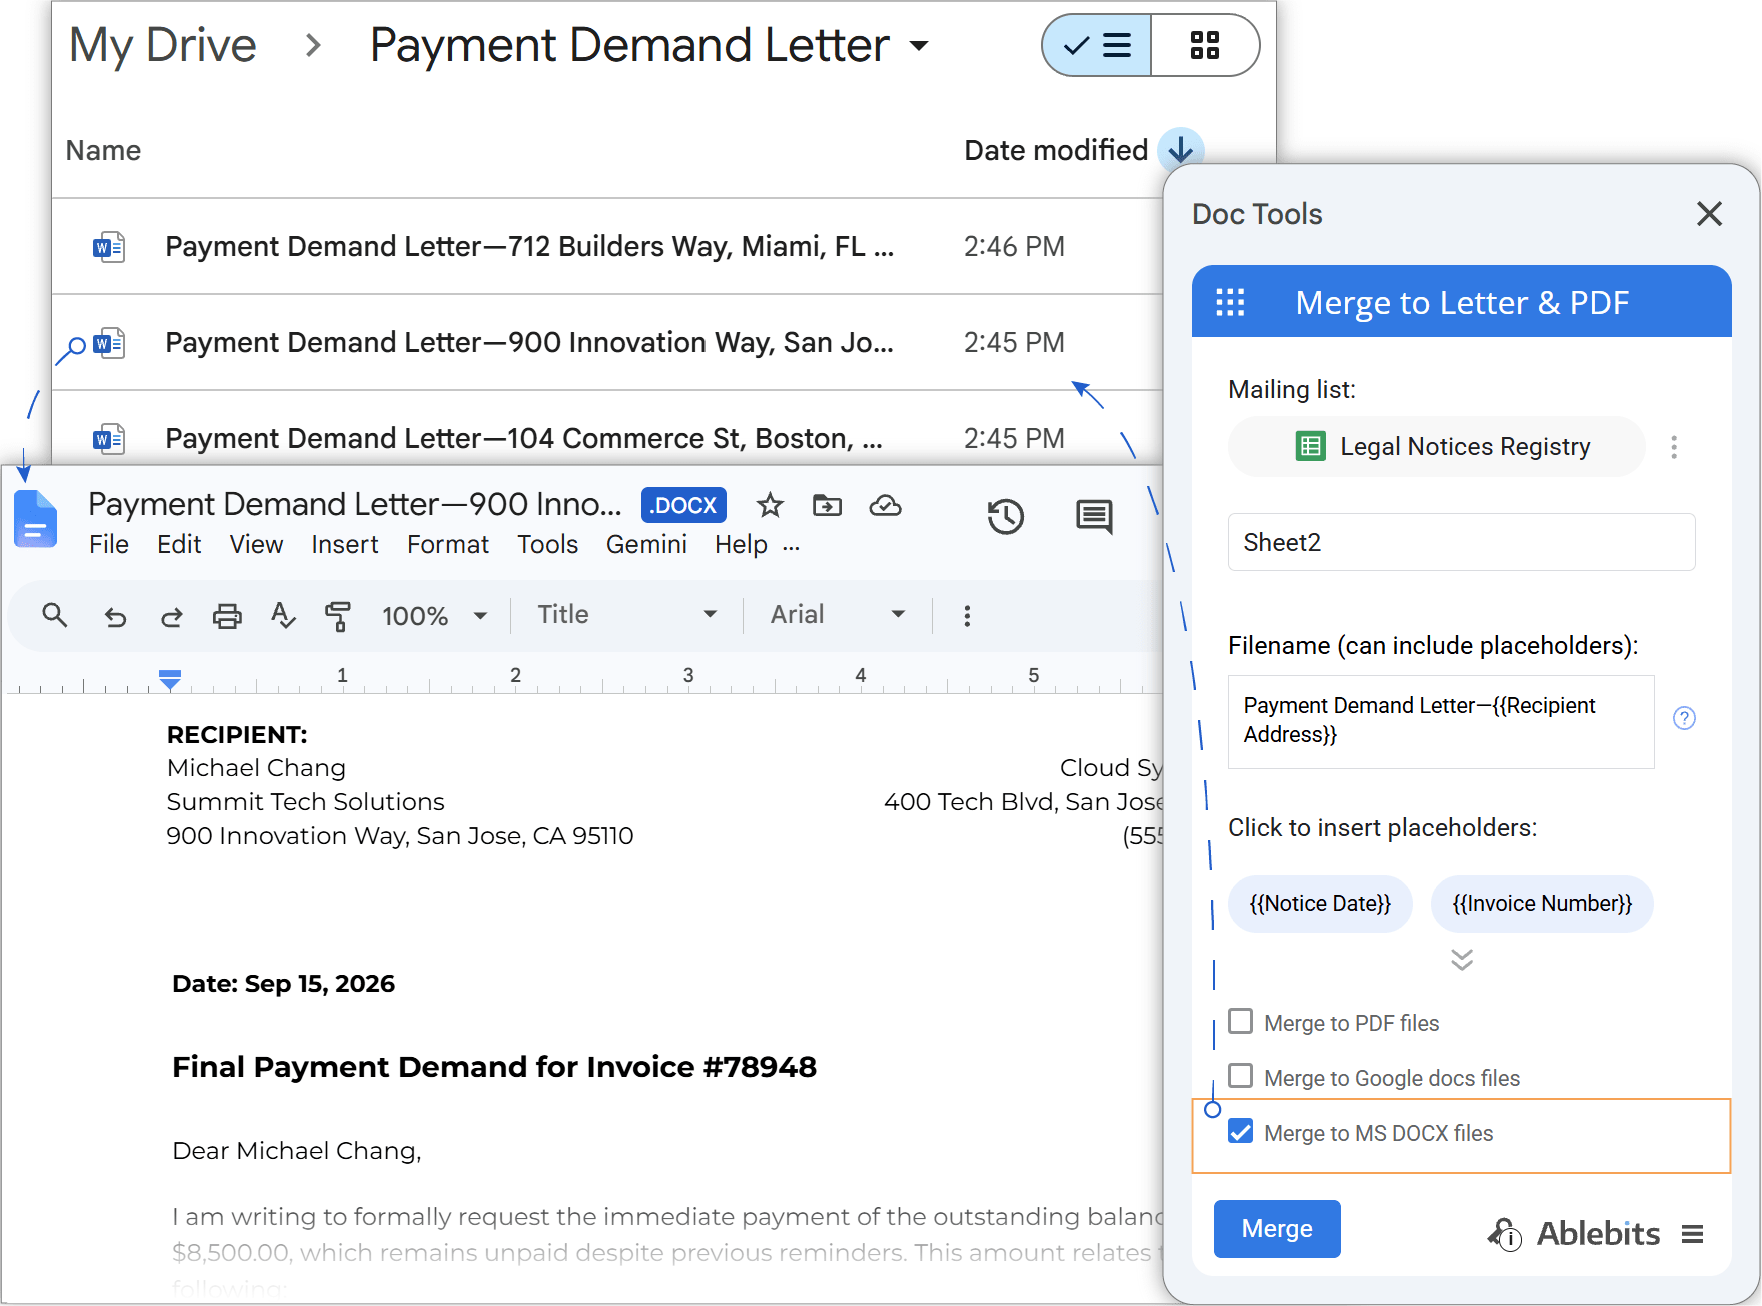
Once generated, download your notices from Google Drive, print them out, and dispatch them via regular mail to maintain your physical proof of service.
Want to send duplicates via email too? Go to !
Key benefit:
With Easy Mail Merge, legal teams can generate standardized legal notices and pre-trial demand letters in bulk without risking costly copy-paste errors. You can also use Easy Mail Merge to quickly create breach of contract notices or dispute letters.
FAQ
Is “Merge to Letter & PDF” part of Easy Mail Merge?
Yes, it’s built right into Easy Mail Merge. If you use Doc Tools, you can find the exact same feature under — just click the waffle icon (nine dots) and select Merge to Letter & PDF.
Can I attach the generated PDF letters to emails automatically?
You can attach the generated PDF letters to emails automatically with Easy Mail Merge. Starting from Google Docs, just switch to .
How do I format my Google Doc template so address blocks fit #10 window envelopes?
Place the recipient’s address at the top left of your Doc, about 2 inches down from the top margin. Keep a clear border around the address block and clear away any logos or text so it aligns cleanly with standard double-window envelopes.
Is Easy Mail Merge HIPAA-compliant for generating patient statements?
Yes. Easy Mail Merge runs entirely inside your Google Workspace account. Your documents and client data never leave your Google Drive, so no patient data is exposed to external third-party servers.
Can I generate Microsoft Word (.docx) files instead of PDFs?
Yes. In the output settings, select Docx instead of PDF. This gives you editable Word files for each recipient.
