
How to clean and structure text in Google Sheets: Use Cases

Learn how to clean and structure text data in Google Sheets without writing nested functions. Follow real-life scenarios to clean CRM contacts, structure product catalogs, and prepare transaction data for accounting reconciliation.
How to clean and normalize text in Google Sheets
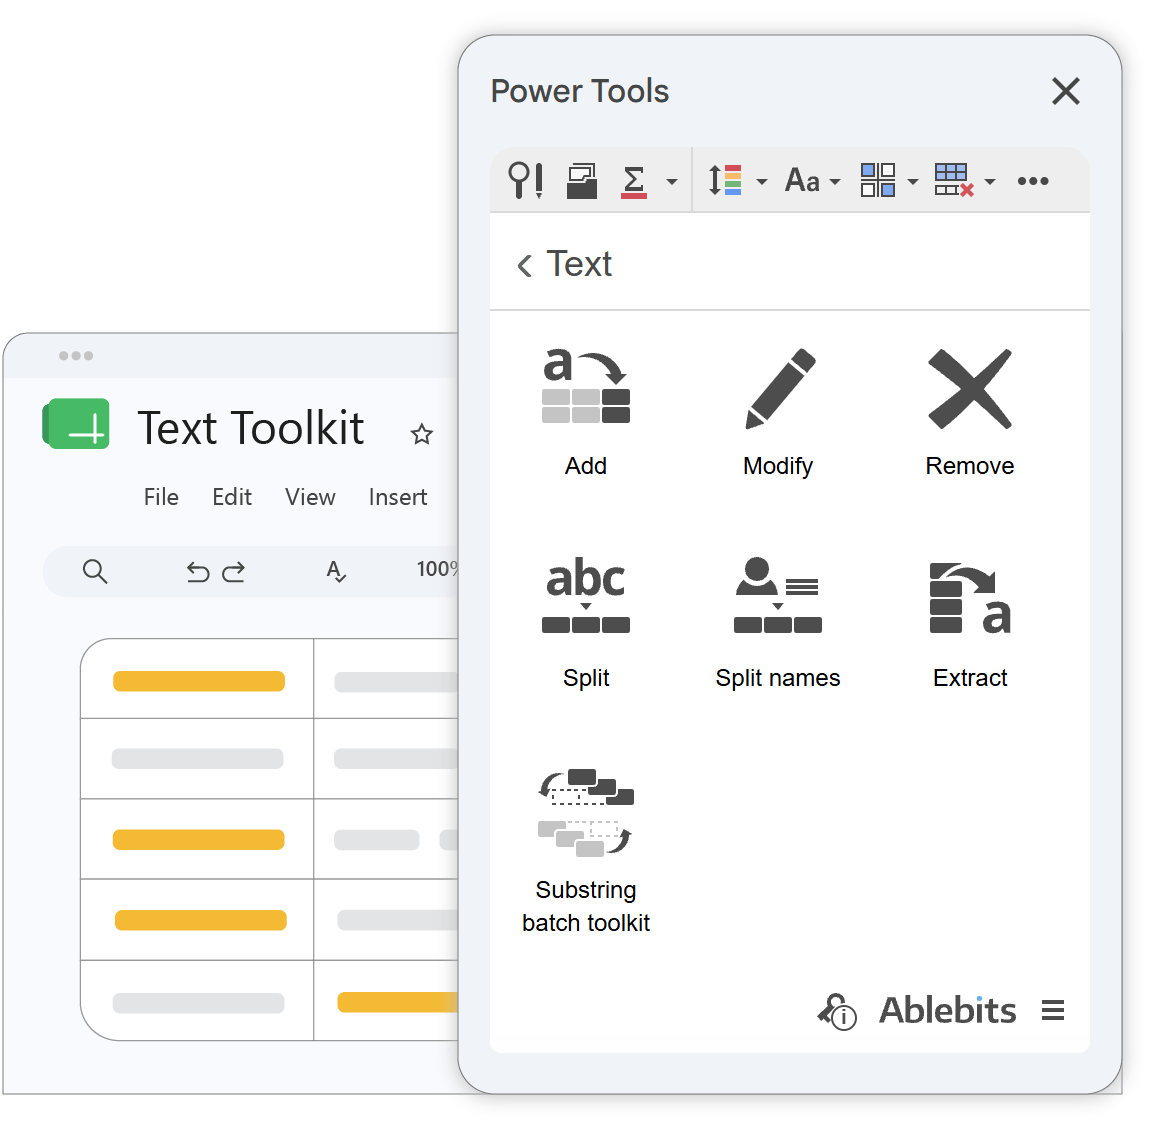
To quickly clean and transform text without complex formulas, use the Text tools available in the Power Tools add-on for Google Sheets:
- Open your sheet and launch Power Tools via .
- Navigate to the Text group in the add-on menu.
- Choose the specialized tool for your task:
- Add: Insert text data at the beginning, end, or after specific character numbers.
- Modify: Change text case, replace symbols, and substitute smart quotes or accented characters.
- Remove: Strip unwanted characters, symbols, or web artifacts (e.g., HTML tags, leading/trailing spaces).
- Split: Divide merged text by custom strings, character positions, or split full names into several columns.
- Extract: Pull out emails, URLs, numbers, or specific text into new columns.
- Substring batch toolkit: Mass find and replace multiple text values across your sheet in a single click.
Case 1: Clean CRM import and format lead contacts for email campaigns
Scenario:
A sales or marketing specialist has a file containing leads collected from multiple sources. The goal is to clean this database and prepare for personalized email campaigns.
Problem:
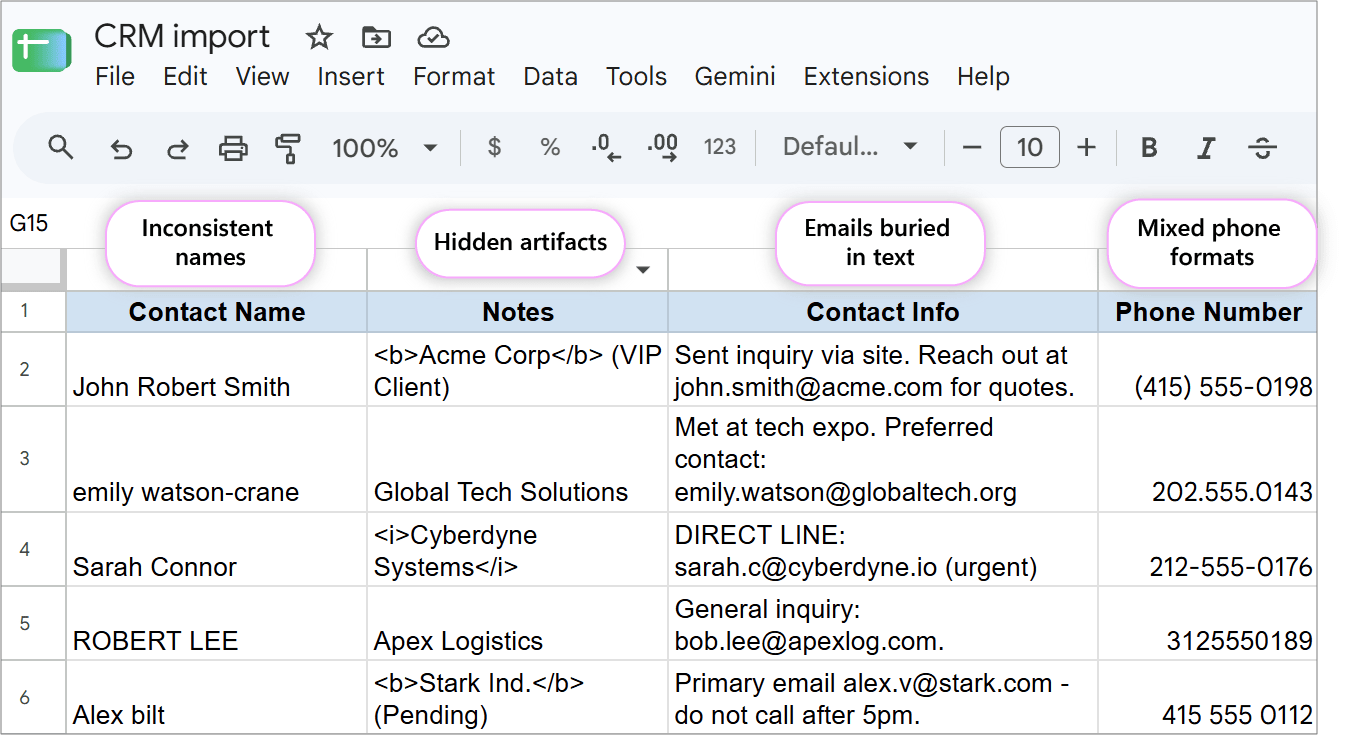
The exported data is unusable for automated CRM tools and email merging:
- Hidden artifacts: Text contains invisible non-breaking spaces and line breaks from web scraping.
- Inconsistent names: Full names are crammed into a single cell with random capitalization.
- Emails buried in text: Email addresses are hidden inside unstructured text within a single cell.
- Mixed phone formats: Phone numbers use inconsistent formatting, spaces, and punctuation.
Solution:
Using the Text group tools in the Power Tools add-on, you can clean, extract, and standardize the entire lead database without writing a single formula. Let’s see how easy you can do it in several steps 👉 .
Step 1: Extract email addresses from text cells in Google Sheets
To pull email addresses directly out of text comments into a clean column:
- Highlight the column containing notes and emails together.
- Go to .
- Open the Extract links group.
- Select Extract email addresses.
- Check Insert new column with results to the right to create a separate column for emails.
- Click Extract.
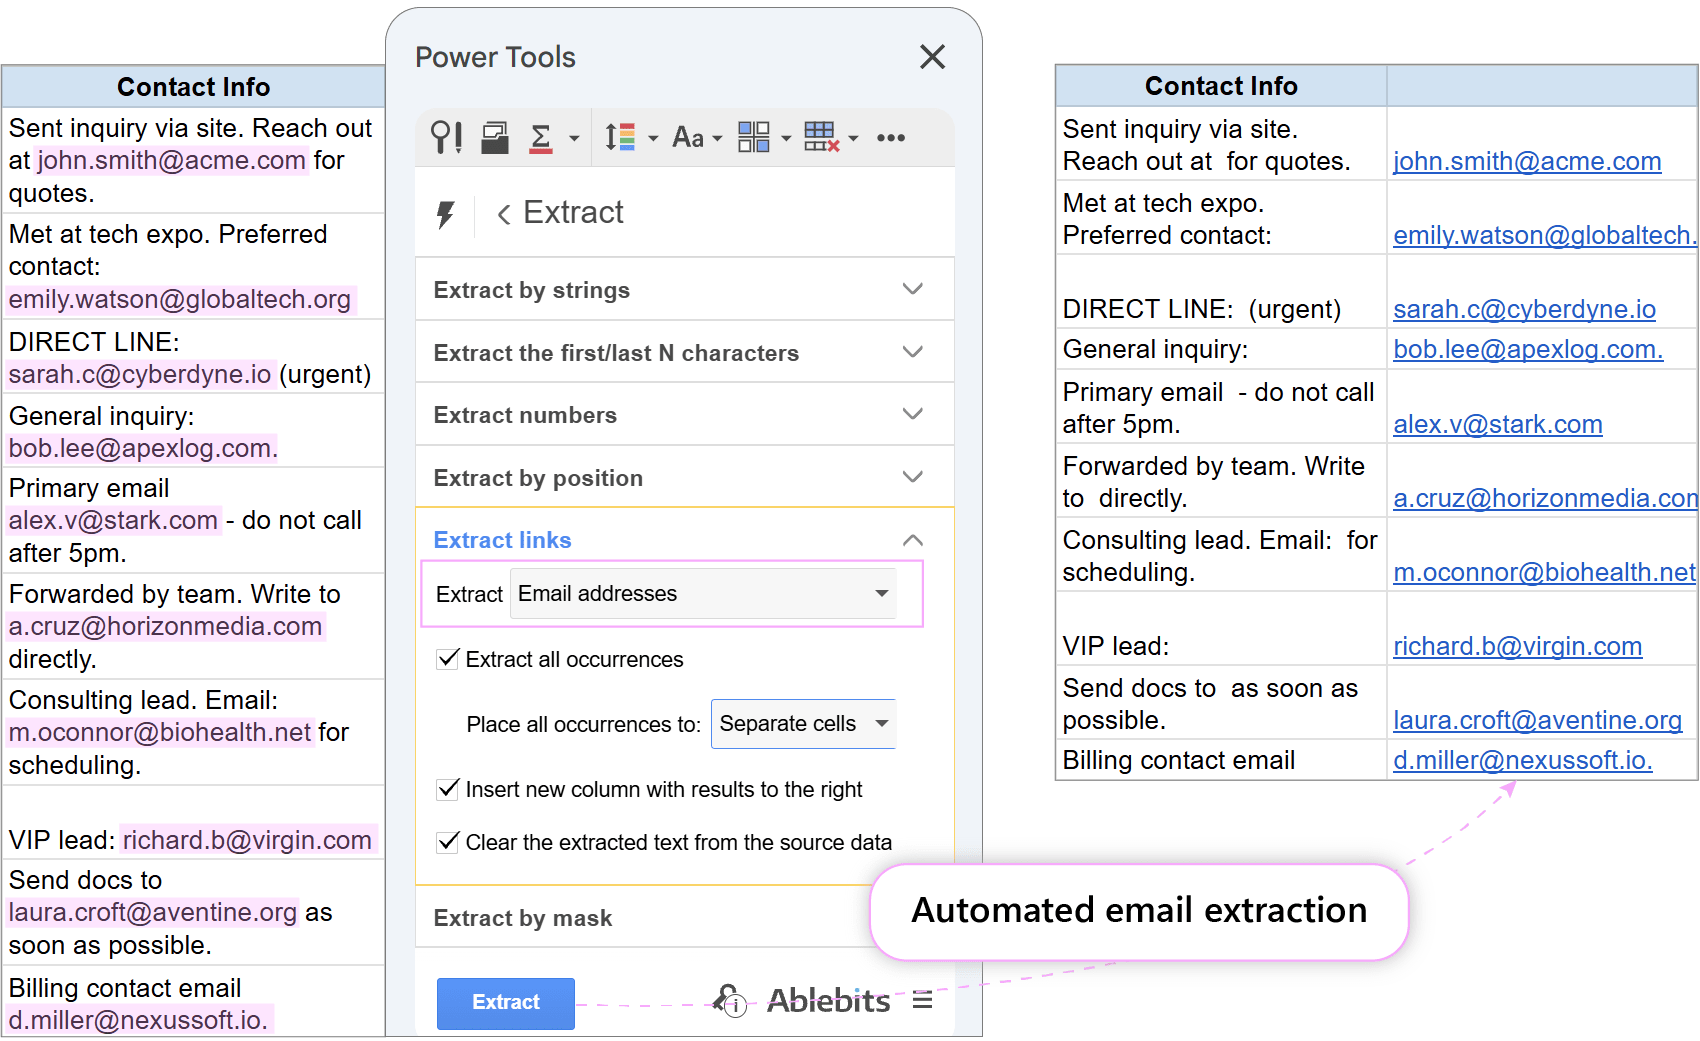
A dedicated Email column instantly appears next to your raw notes. If you no longer need the original comment text, you can now safely delete the notes column.
Step 2: Split full names into first and last name columns
To isolate first and last names for personalized email tags in future (“Hi {{First Name}},”):
- Select the Contact Name column.
- Go to .
- Check the name elements to split: First Name and Last Name.
- Click Split.
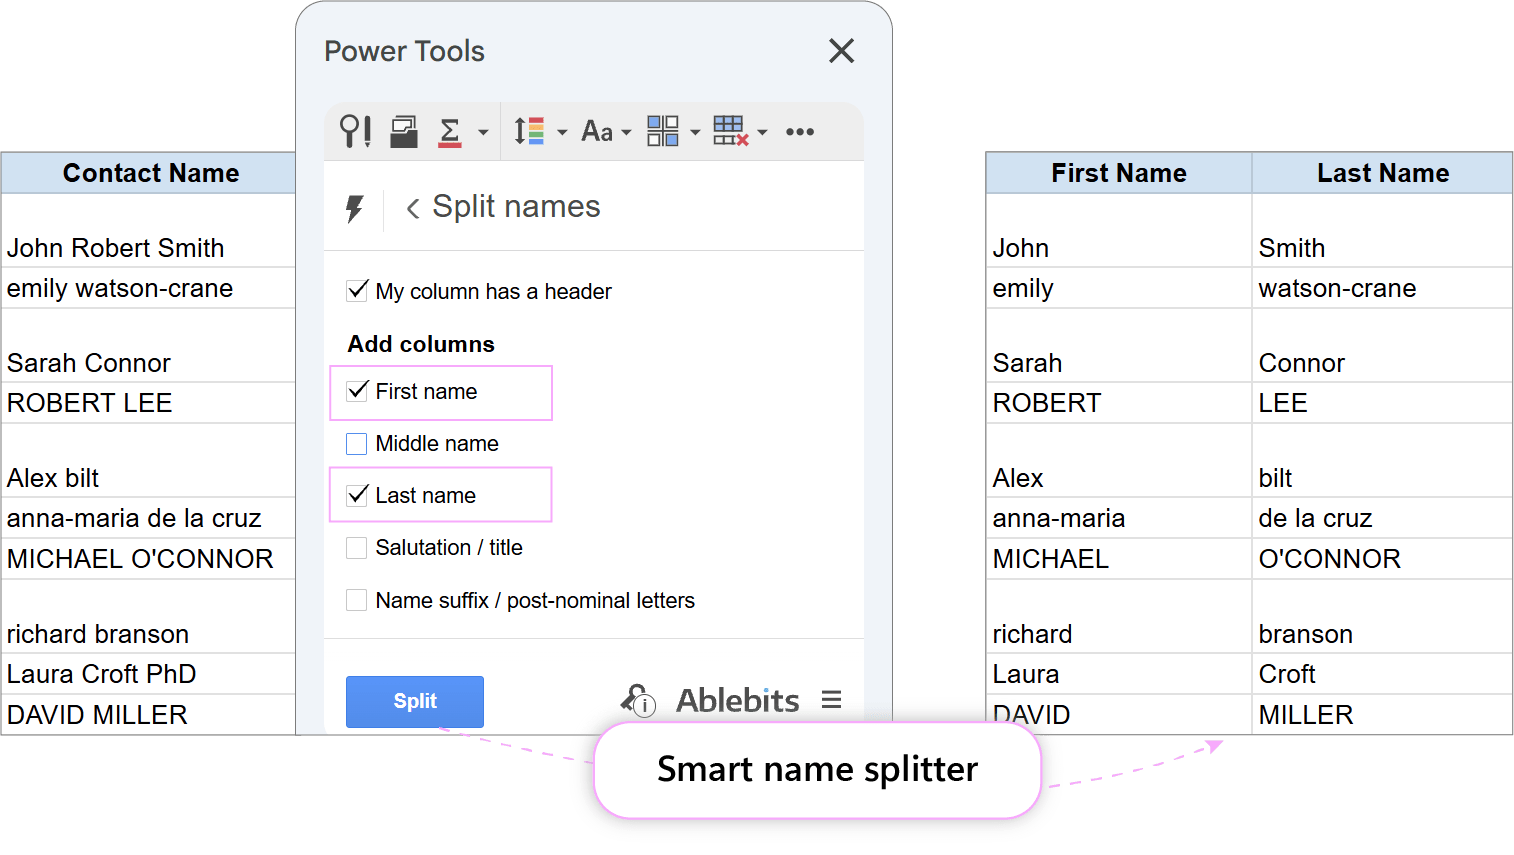
The add-on creates separate columns for each name part.
Step 3: Fix capitalization and change case in Google Sheets
To normalize chaotic upper/lowercase entries across your newly split name columns:
- Highlight the First Name and Last Name columns.
- Go to .
- Choose Capitalize Each Word (or lower & Capitalize if names have mixed casing like jOHn).
- Click Modify.
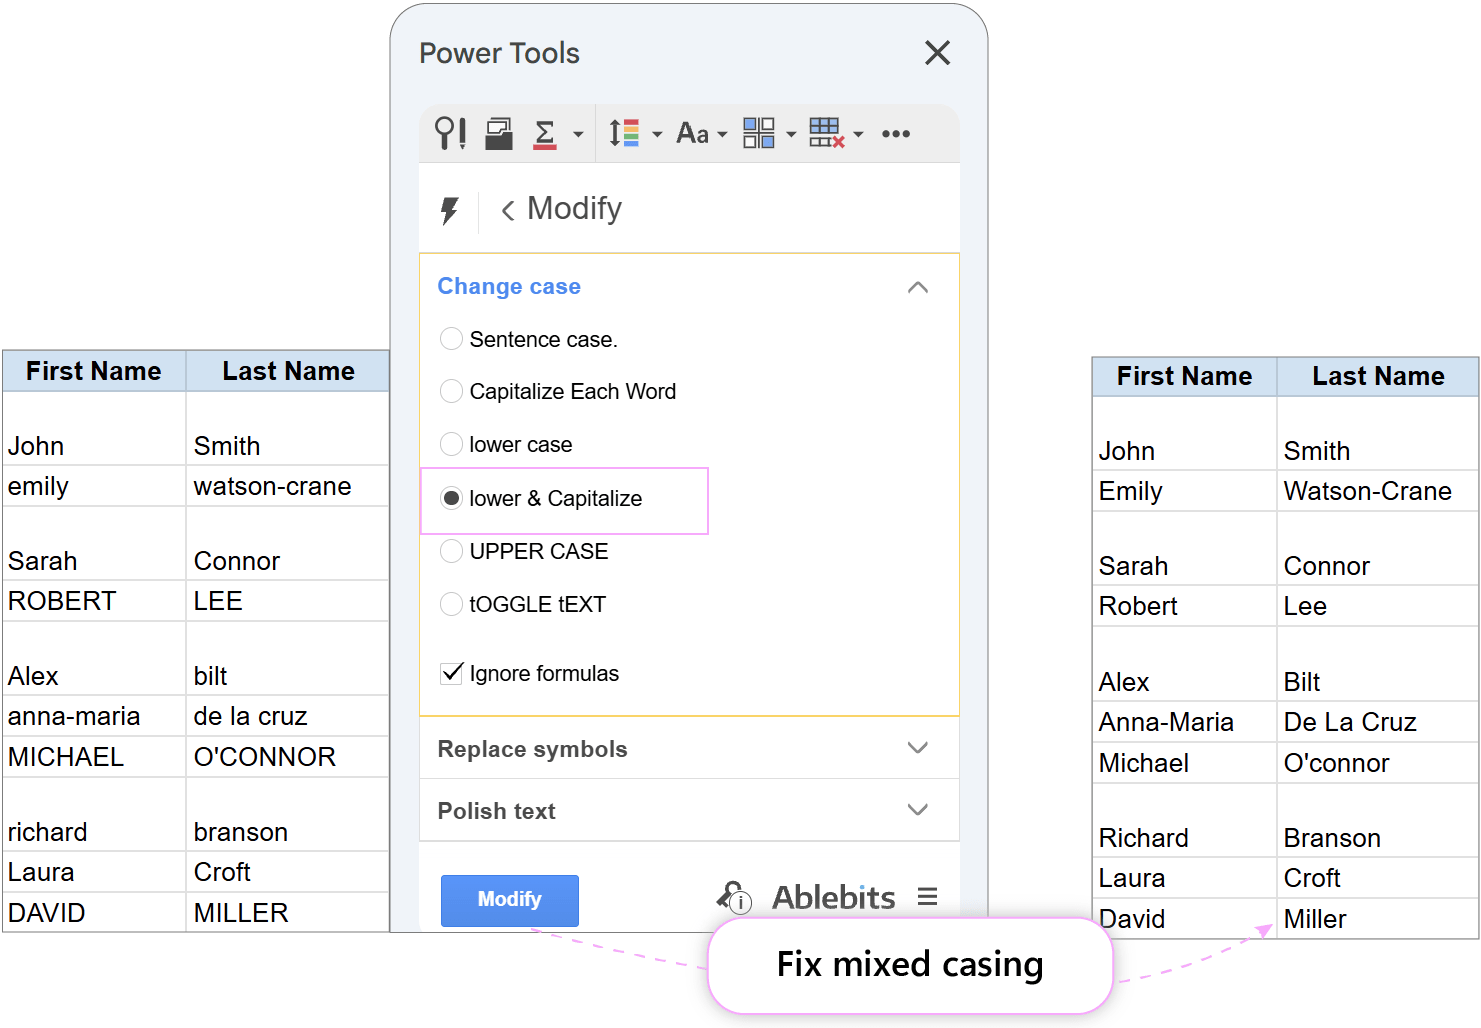
As you can see, your names now have a perfectly consistent look.
Step 4: Format and standardize phone numbers to E.164 format
To clean up punctuation and apply standard US country codes:
Remove hyphens, brackets, and periods:
- Select your phone column and open .
- Under Remove substrings or characters, check Remove entered characters individually.
- Enter the punctuation marks to strip: . ( ) - and press Space to include spaces.
- Click Remove.
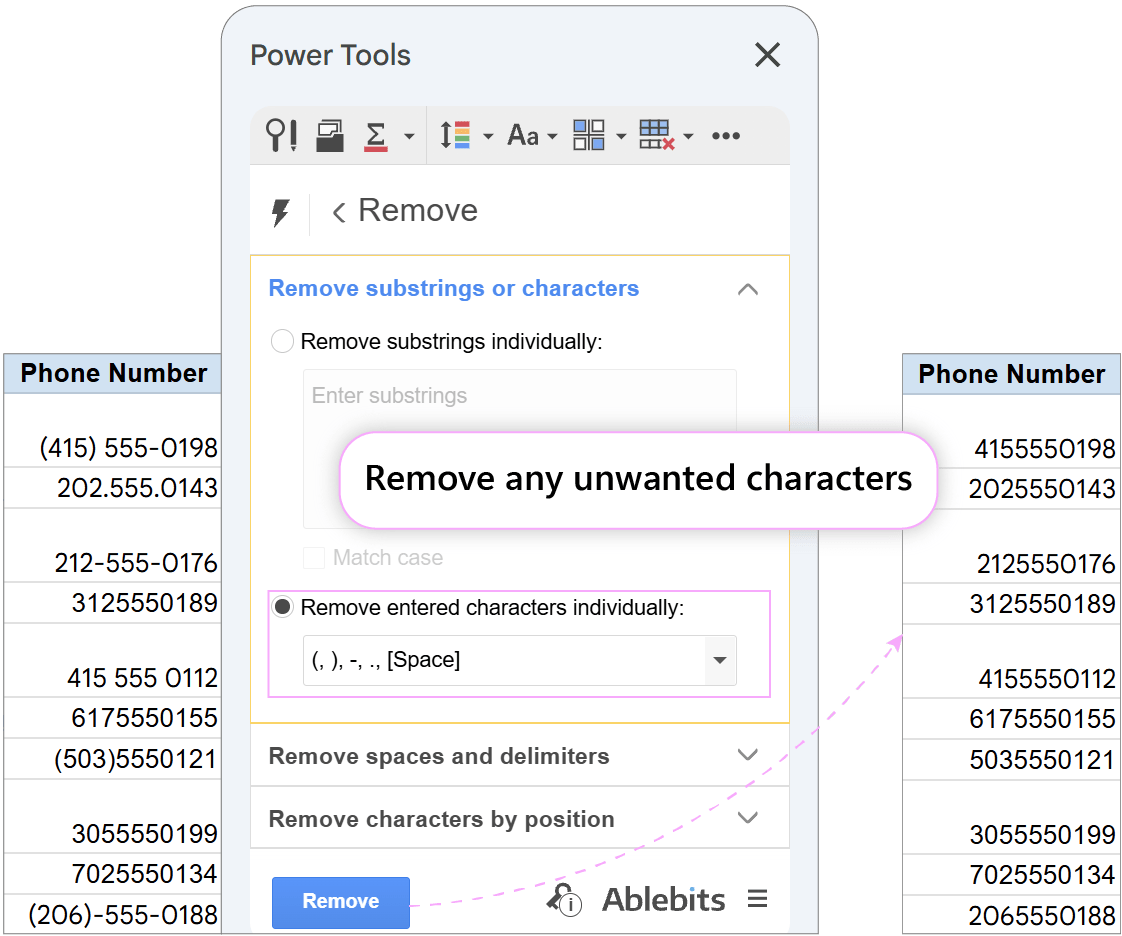
You are left with pure digits (e.g., 5550192831).
Add standard US country code (+1):
- Highlight the clean numbers and go to .
- Under Add the following text in the selected cells, enter +1.
- Select At the beginning.
- Click Add.
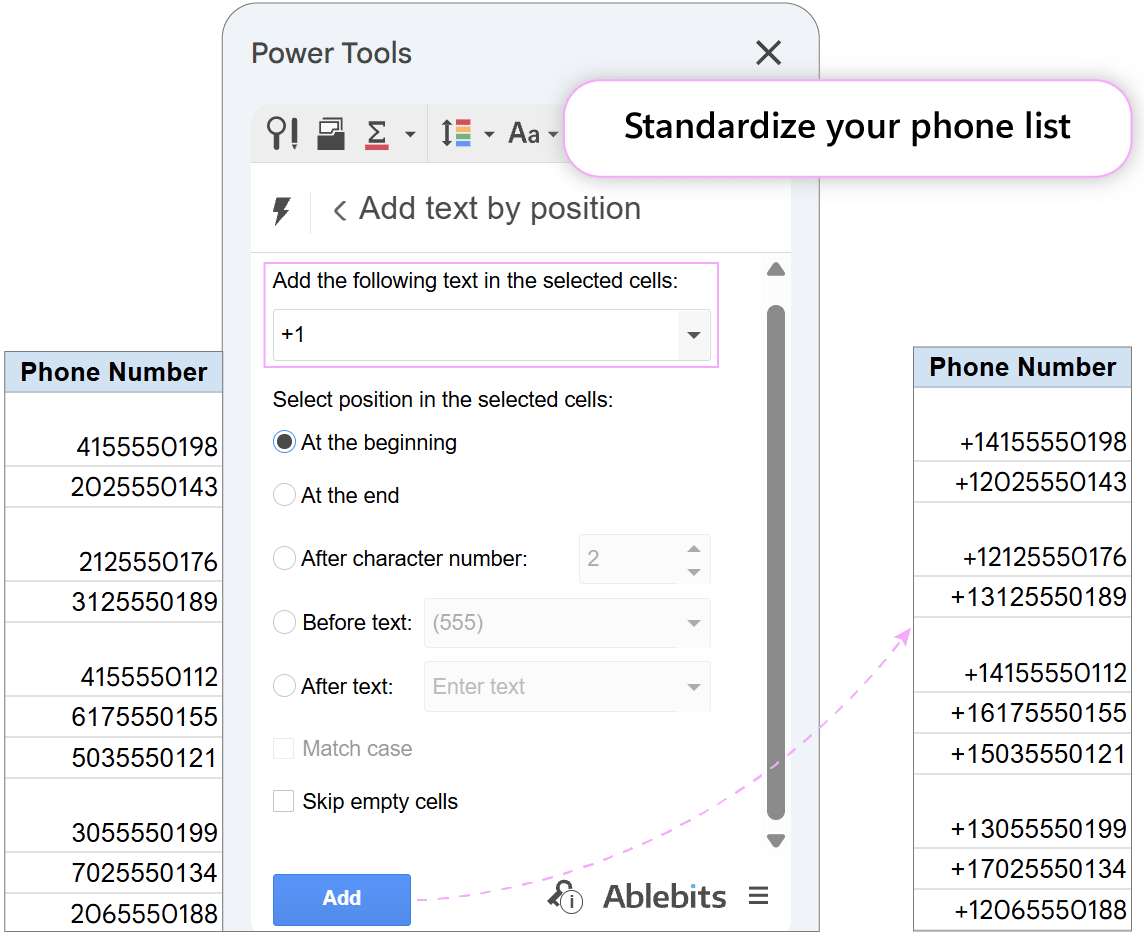
Now your phone numbers are standardized to the universal E.164 format.
Step 5: Trim extra spaces and remove line breaks / non-breaking spaces
To remove web-scraped artifacts, HTML codes, and invisible space characters across your dataset:
- Select your dataset and open .
- Go to the Remove spaces and delimiters section.
- Check:
- Remove leading and trailing spaces
- Remove spaces between words to one
- Remove html entities
- Remove html tags
- Remove non-printing characters
- Click Remove.
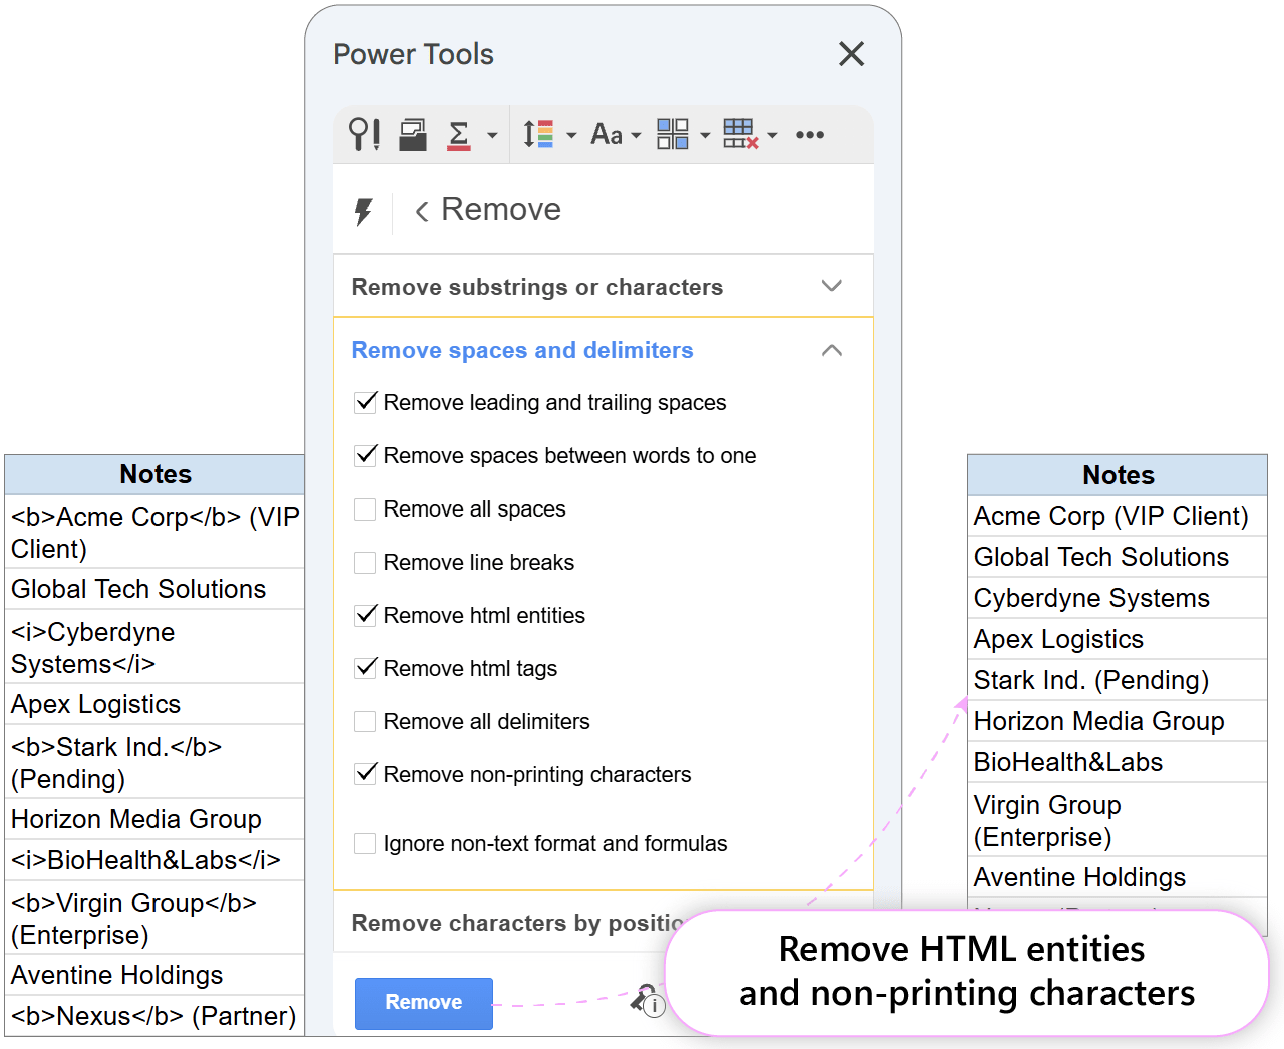
The end result will be a clean lead database, ready for use with email mail merge, WhatsApp or SMS campaigns.
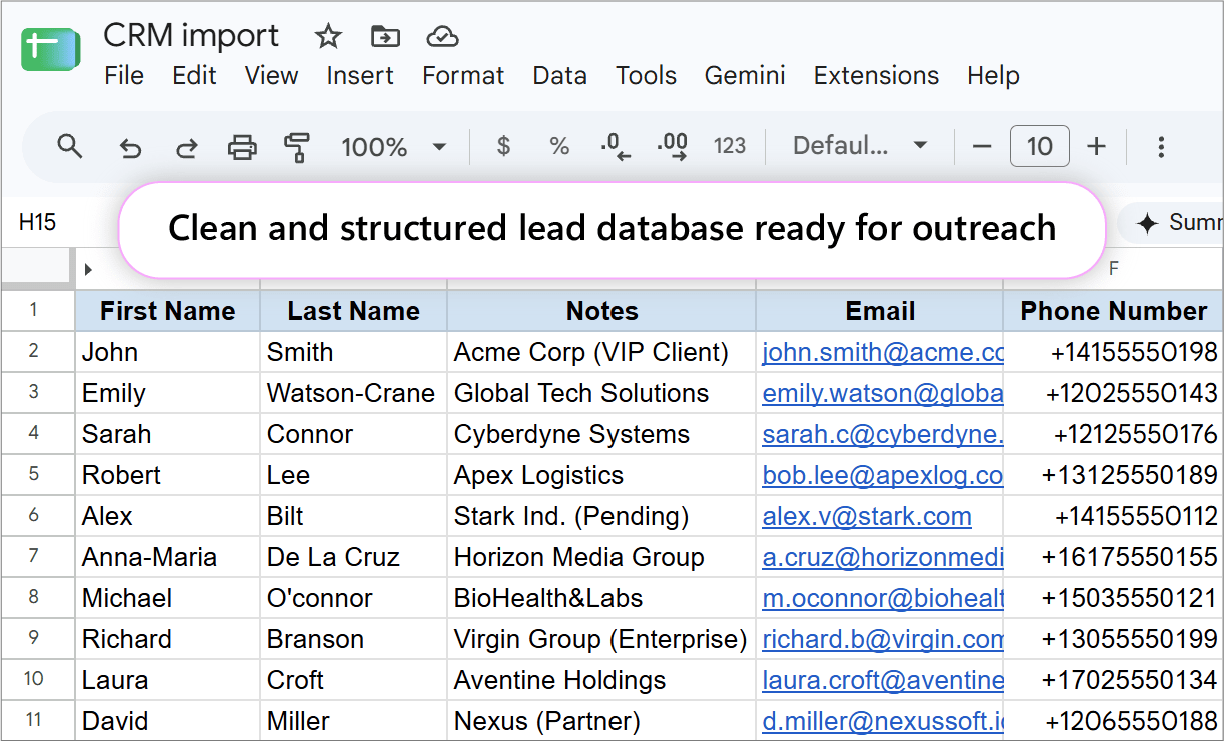
If you’re preparing to launch email campaigns, check out Easy Mail Merge (opens in a new tab) to personalize and track your emails effortlessly.
Case 2: Structure product catalogs in Google Sheets
Scenario:
A store manager receives a supplier spreadsheet containing product data. The goal is to prepare a structured catalog for seamless import into platforms like Shopify or Amazon.
Problem:
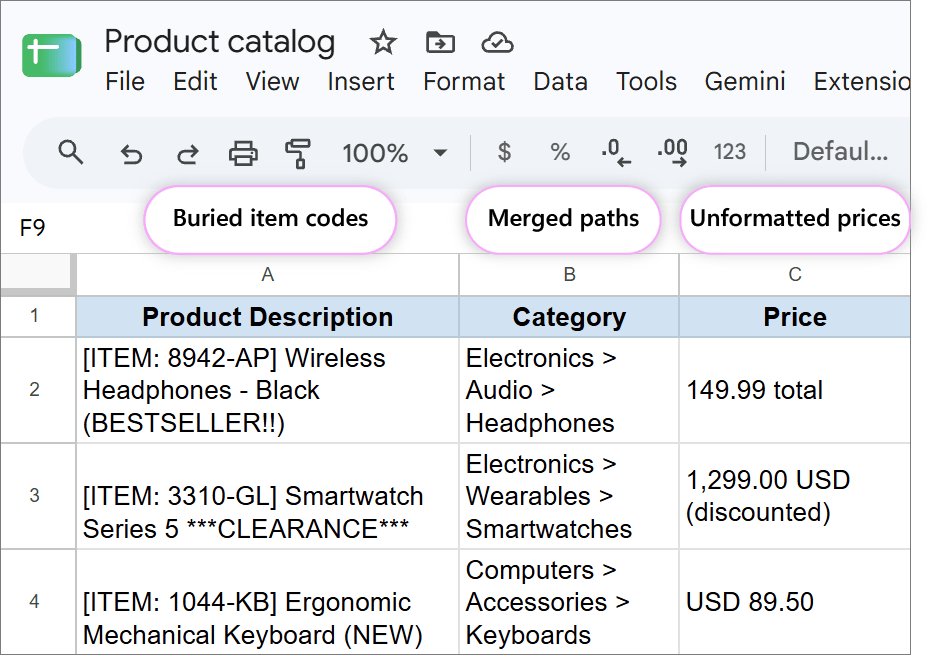
The dataset cannot be uploaded directly to e-commerce platforms due to structural and formatting issues:
- Buried item codes: Internal product codes are trapped inside product descriptions.
- Unformatted prefixes: Сodes contain unwanted brackets and labels instead of standard inventory prefixes.
- Merged paths: Full category hierarchies are crammed into single cells.
- Unformatted prices: Prices contain text, preventing numerical calculations.
Solution:
Using the Text group tools in the Power Tools add-on, you can standardize your product catalog in several easy steps.
Step 1: Extract internal item codes from product descriptions
To isolate embedded product codes into a dedicated column:
- Select the column containing product descriptions with codes.
- Go to .
- Select Extract by mask and enter [*] in the input field.
- Check Insert new column with results to the right and Clear the extracted text from the source data to automatically remove the code from your description and pull them to the right column.
- Click Extract.
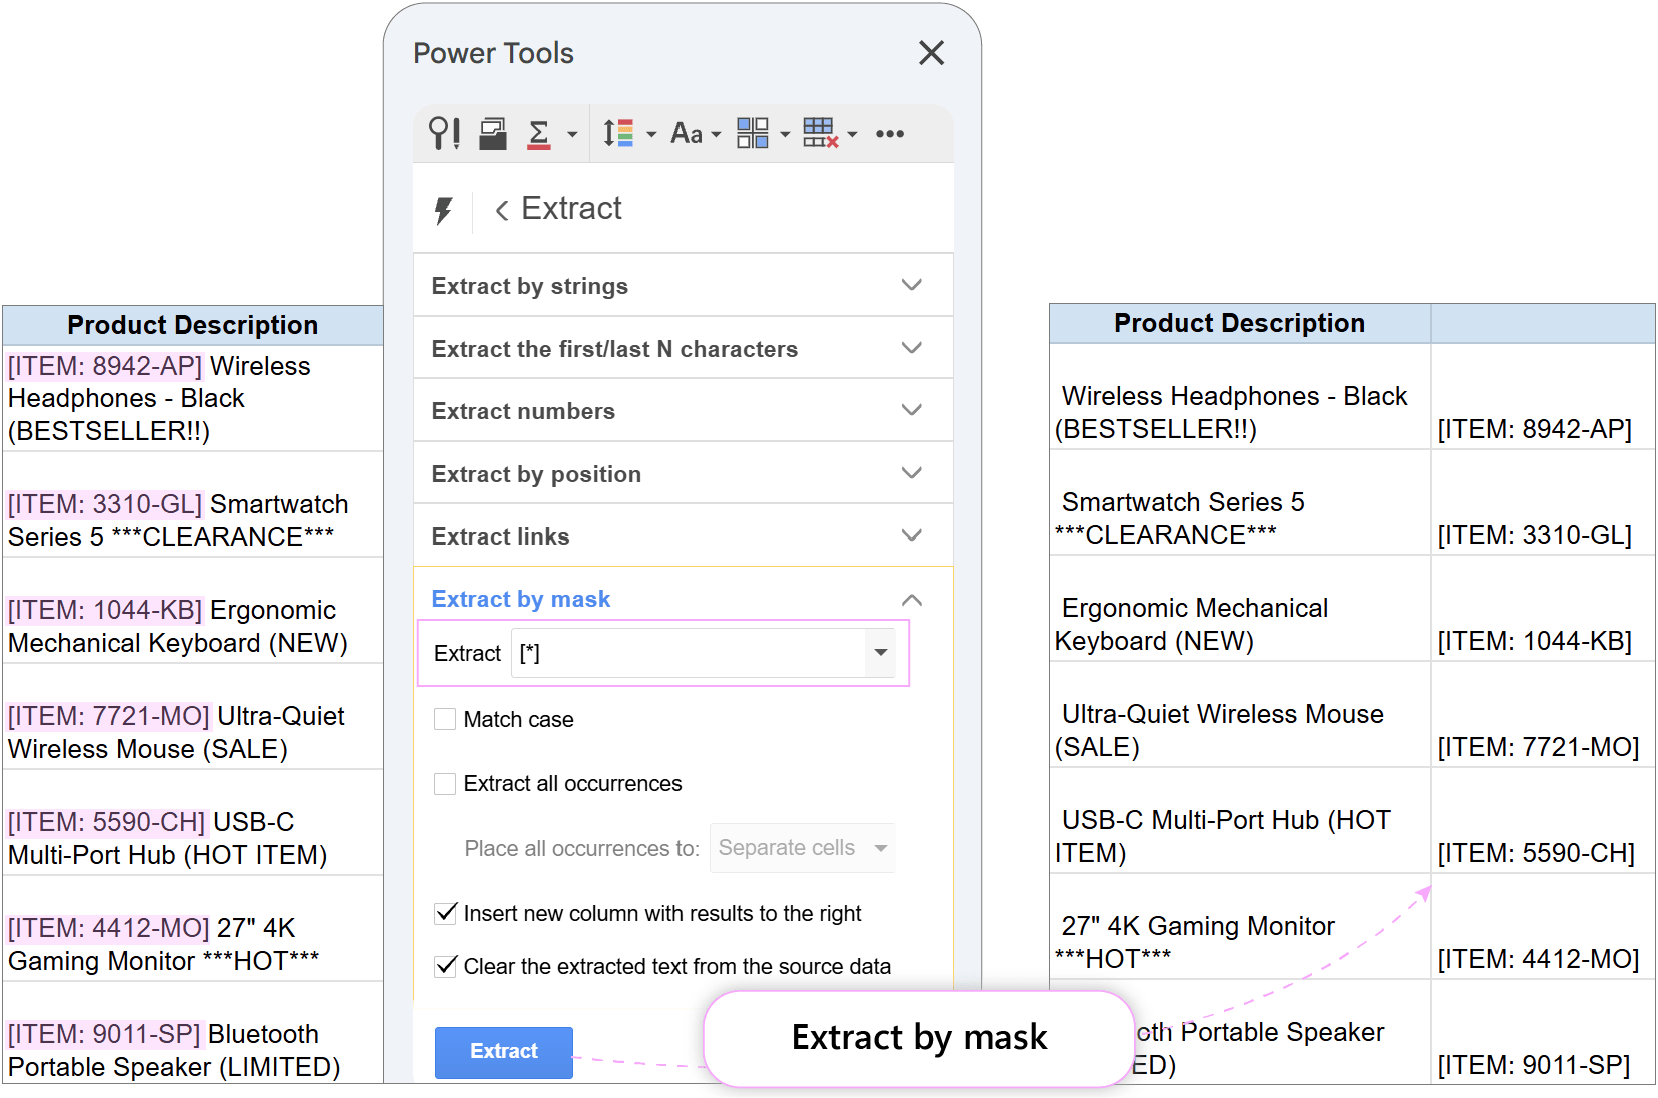
A new column containing raw codes like [ITEM: 8942-ap] is added right next to your product descriptions.
Step 2: Remove substrings and convert code prefixes to SKU- format
To replace [ITEM:…] with a SKU- prefix across your newly extracted codes:
Remove brackets and the ITEM label:
- Select your extracted code column.
- Go to .
- Under Remove substrings individually, enter [ITEM: and ] (each on a separate line).
- Click Remove.
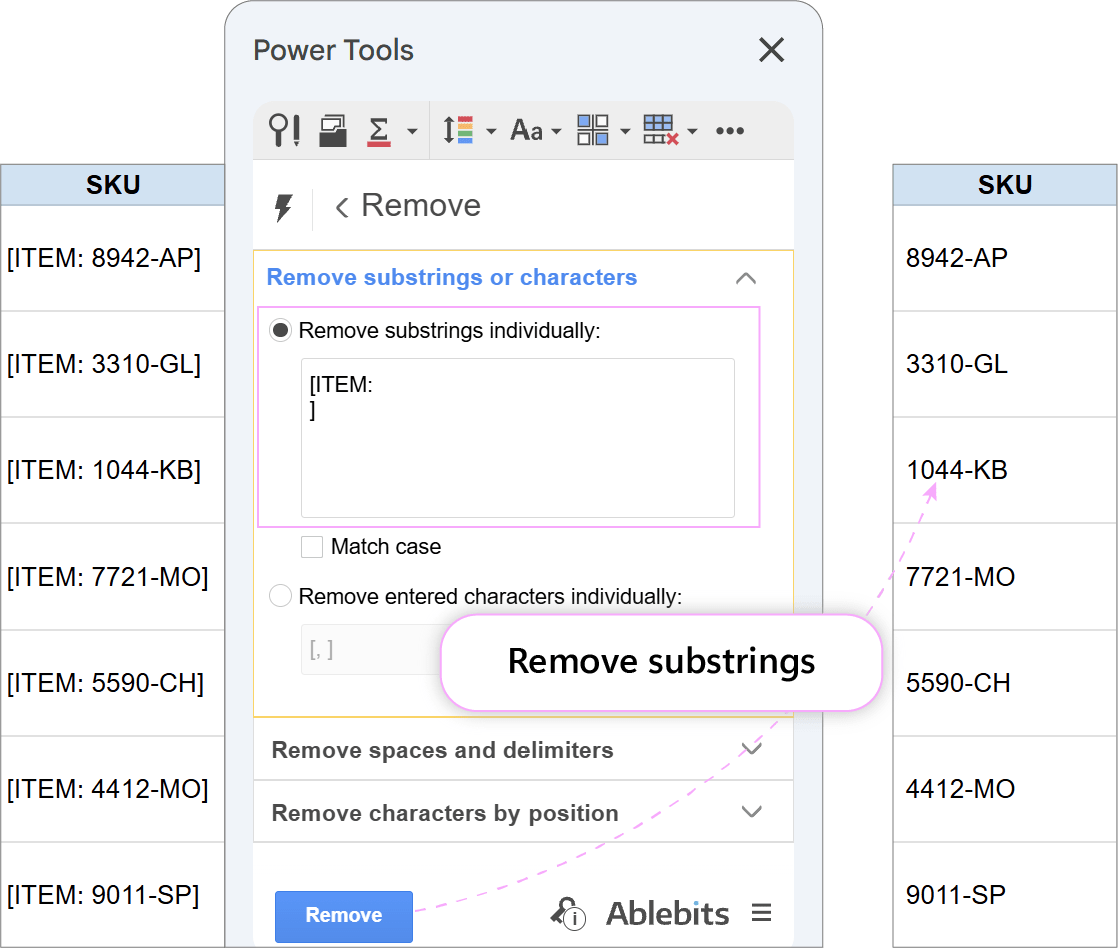
You are left with raw code numbers (e.g., 8942-AP).
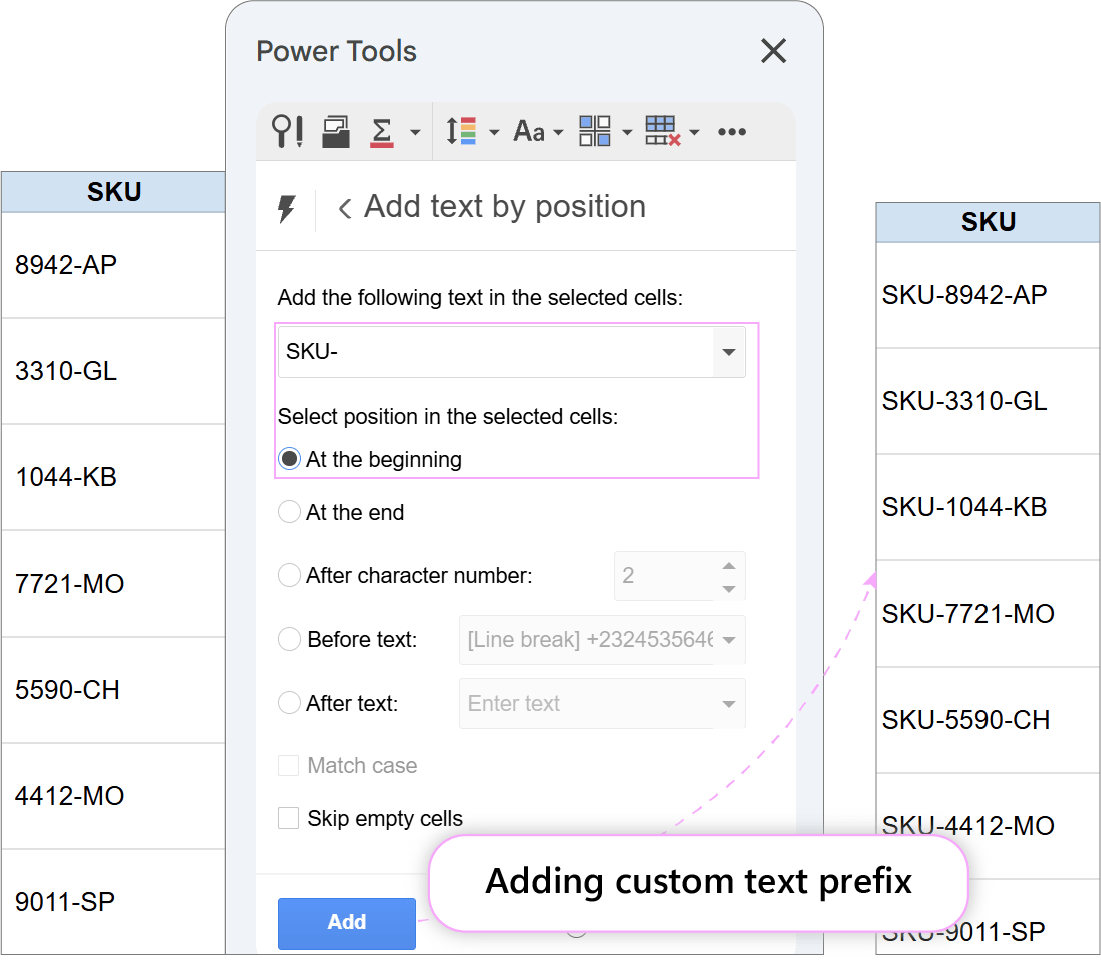
Add the standard SKU- prefix:
- Go to .
- Under Add the following text in the selected cells, enter SKU-.
- Select At the beginning.
- Click Add.
Step 3: Split category paths into structured columns
To separate category trees into distinct main category, subcategory, and product type fields:
- Select the column with merged category paths.
- Go to .
- Choose Split values by characters.
- Enter > (or your supplier’s specific delimiter) as the custom string.
- Select Split values to columns.
- Click Split.
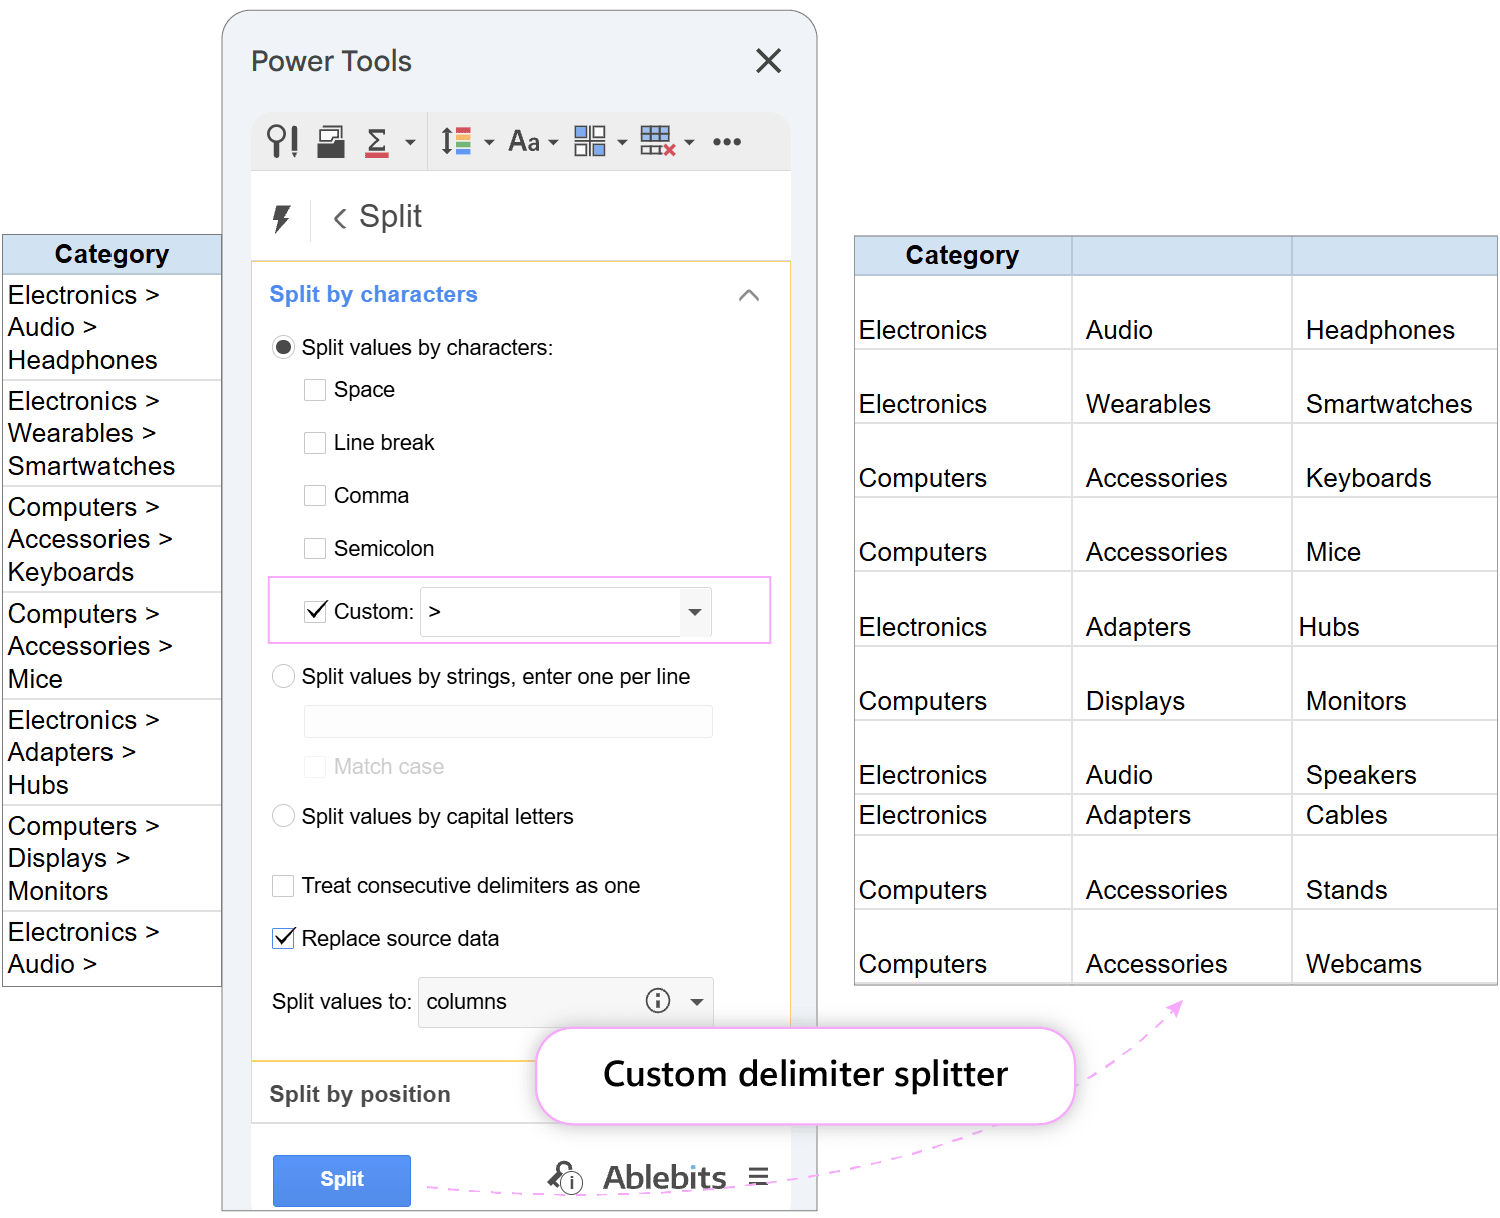
The add-on distributes each category level into its own individual column.
Step 4: Extract clean numeric prices
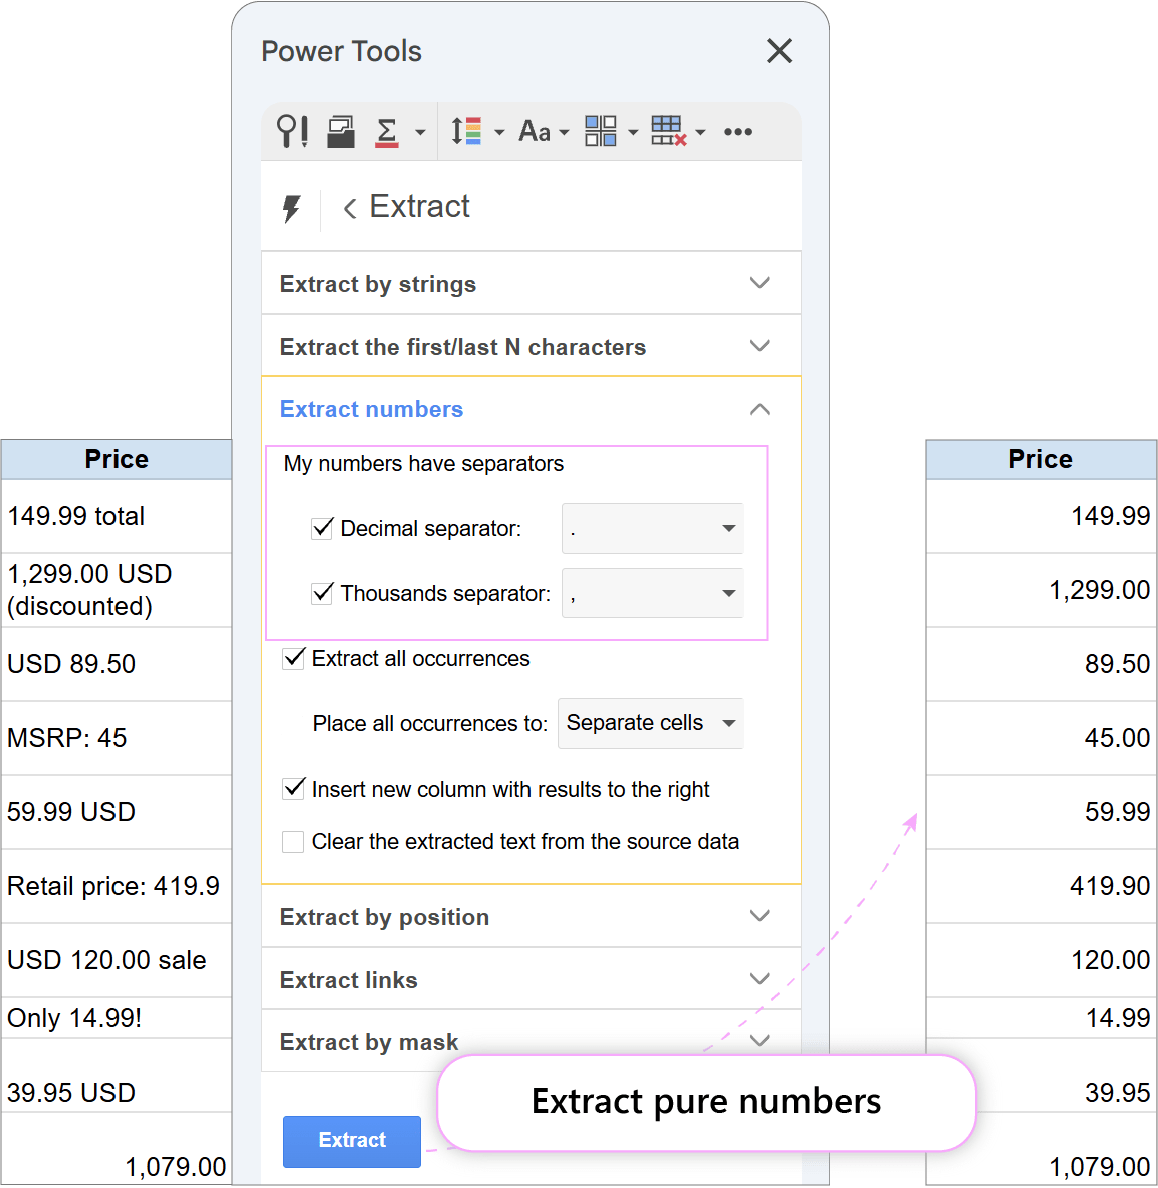
To leave pure numbers ready for calculations:
- Highlight the column containing raw prices.
- Go to .
- Open the Extract numbers group.
- Select your decimal and thousands separators and check Insert new column with results to the right.
- Click Extract.
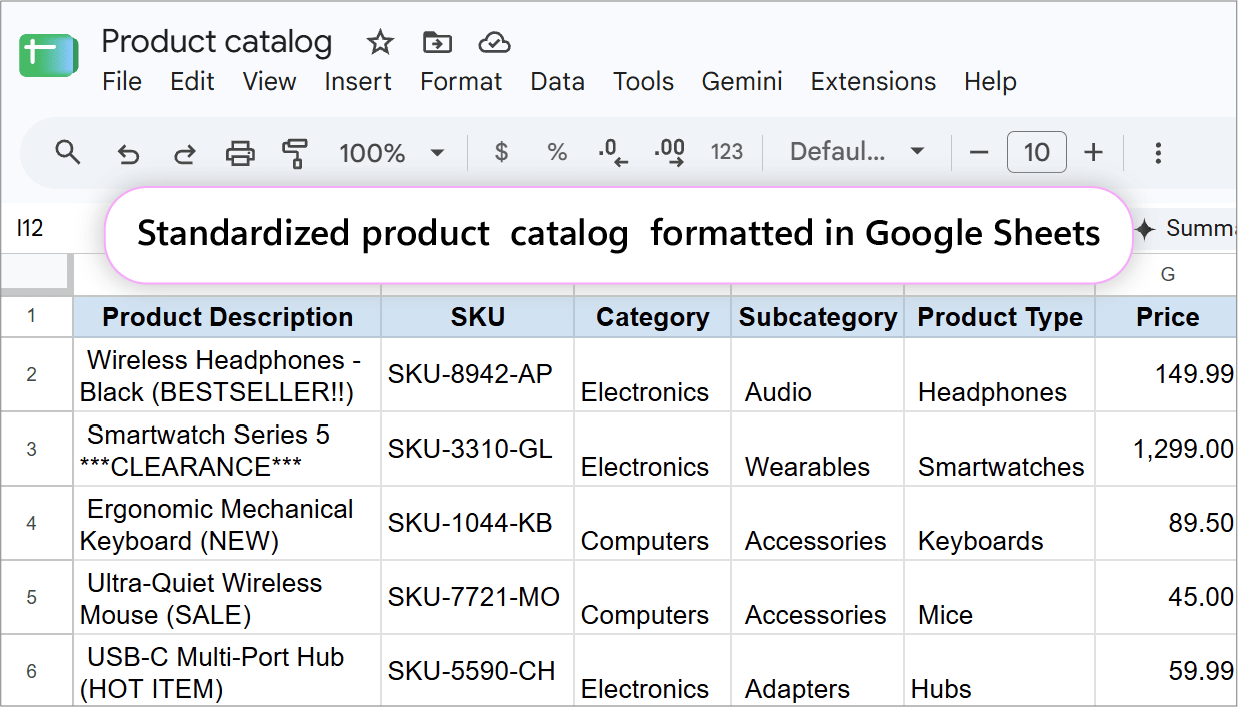
The end result is a fully structured product catalog ready for direct import into your e-commerce store.
Case 3: Format transaction data and payment exports in Google Sheets
Scenario:
A business owner receives transaction exports from banking portals or payment gateways (e.g., Stripe, PayPal). The goal is to clean and format this financial database and prepare it for accounting reconciliation.
Problem:
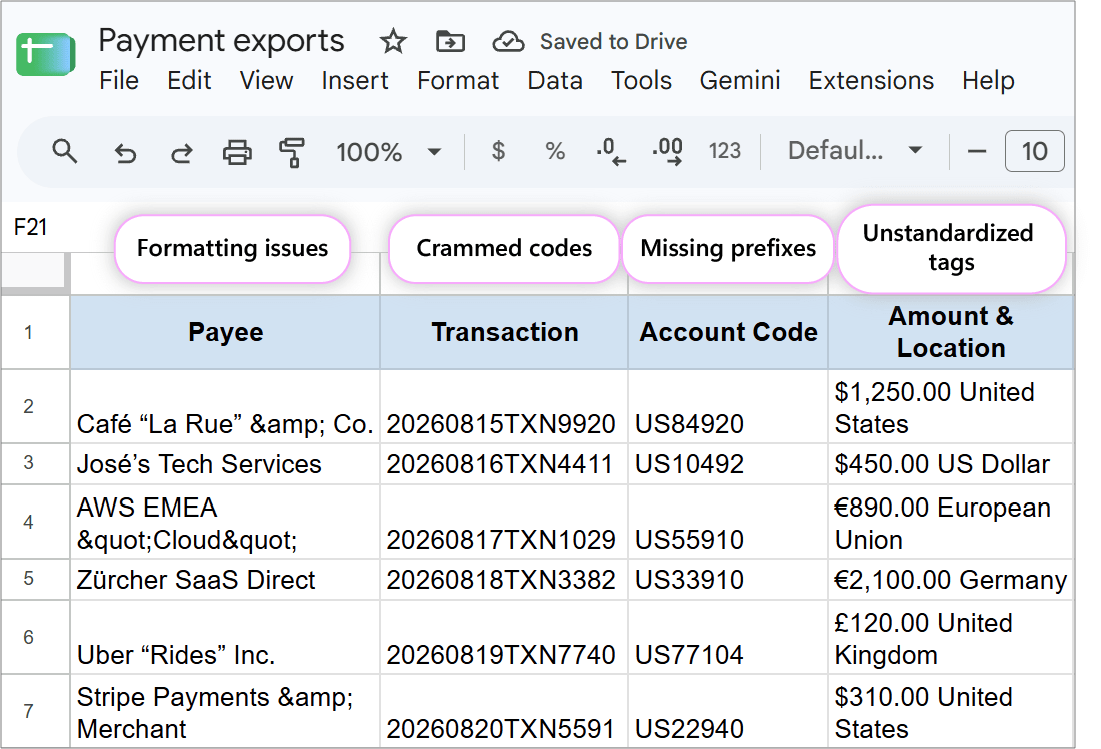
Raw banking exports contain non-standard formatting that breaks automated reconciliation:
- Formatting issues: Accents, smart quotes, and HTML tags can break CSV exports.
- Crammed codes: Transaction IDs are merged into a string together with the payment date.
- Missing prefixes: Internal ledger numbers need standardized prefixes inserted at precise positions.
- Unstandardized tags: Location and currency labels use mixed text formats attached to transaction amounts.
Solution:
Using the Text tools in Power Tools, you can normalize text and batch-replace categories in minutes without formulas.
Step 1: Replace accented characters, smart quotes, and symbol codes
To normalize international vendor names and text formatting:
- Select the column containing raw transaction descriptions or counterparty names.
- Go to .
- Open the Replace symbols group.
- Check Replace accented characters, e.g. á with a.
- Click Modify.
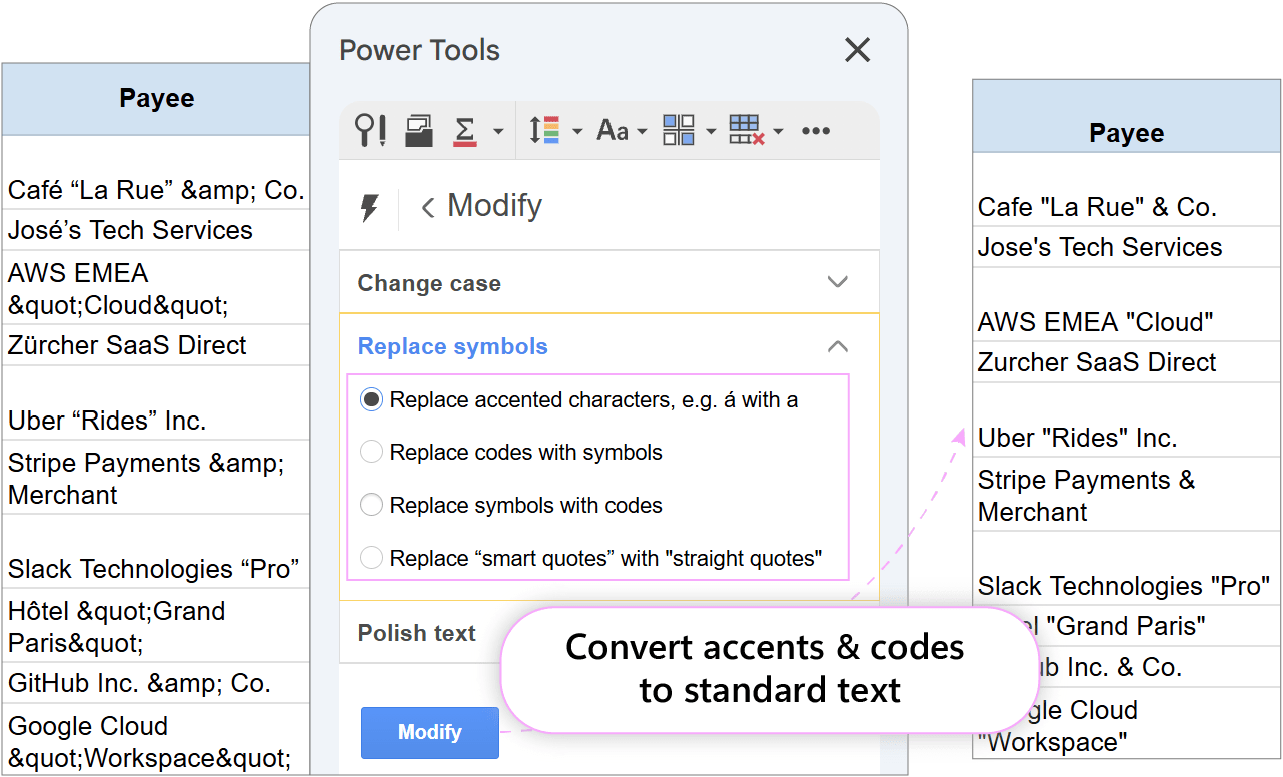
To clear other artifacts, repeat the steps above and select Replace codes with symbols or Replace “smart quotes” with “straight quotes”.
All accent marks, curly quotes, and HTML symbol codes across your transaction notes are instantly converted to standard text.
Step 2: Split fixed-width transaction codes by position
To separate fixed-length date prefixes from internal transaction IDs (e.g., splitting 20260831TXN9920 into date and code):
- Highlight the column with combined reference codes.
- Go to .
- Select Split by position.
- Click the ruler after the 8th character to place a split line (to split right after the 8-digit date string YYYYMMDD).
- Click Split.
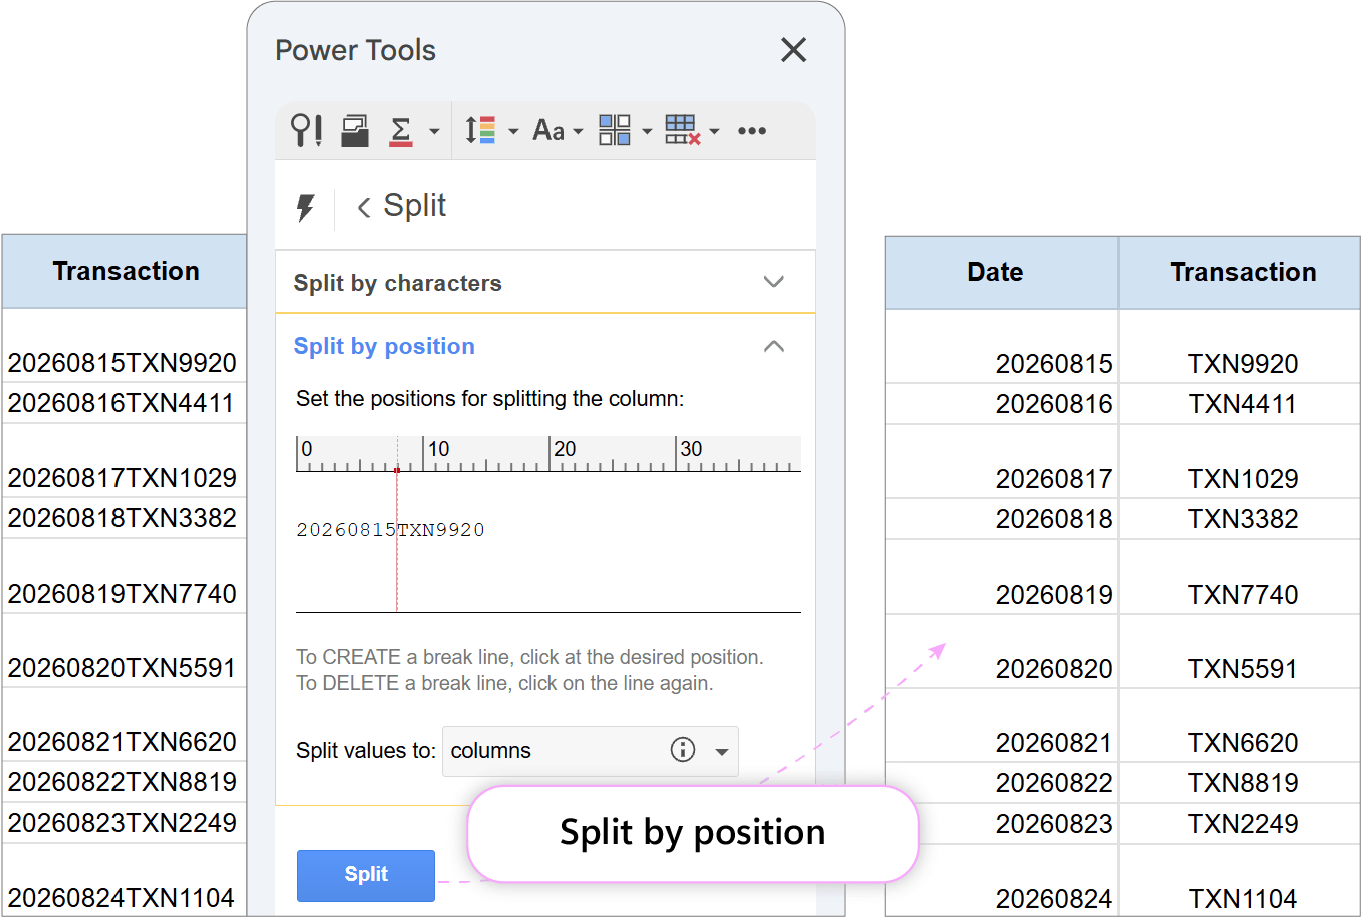
The date string and transaction ID are separated into two adjacent columns.
Step 3: Add text by position after specific character numbers
To insert standard ledger prefixes right after account codes:
- Highlight your account or reference code column.
- Go to .
- Under Add the following text in the selected cells, enter GL-.
- Under Select position in the selected cells, choose After character number and type 2.
- Click Add.
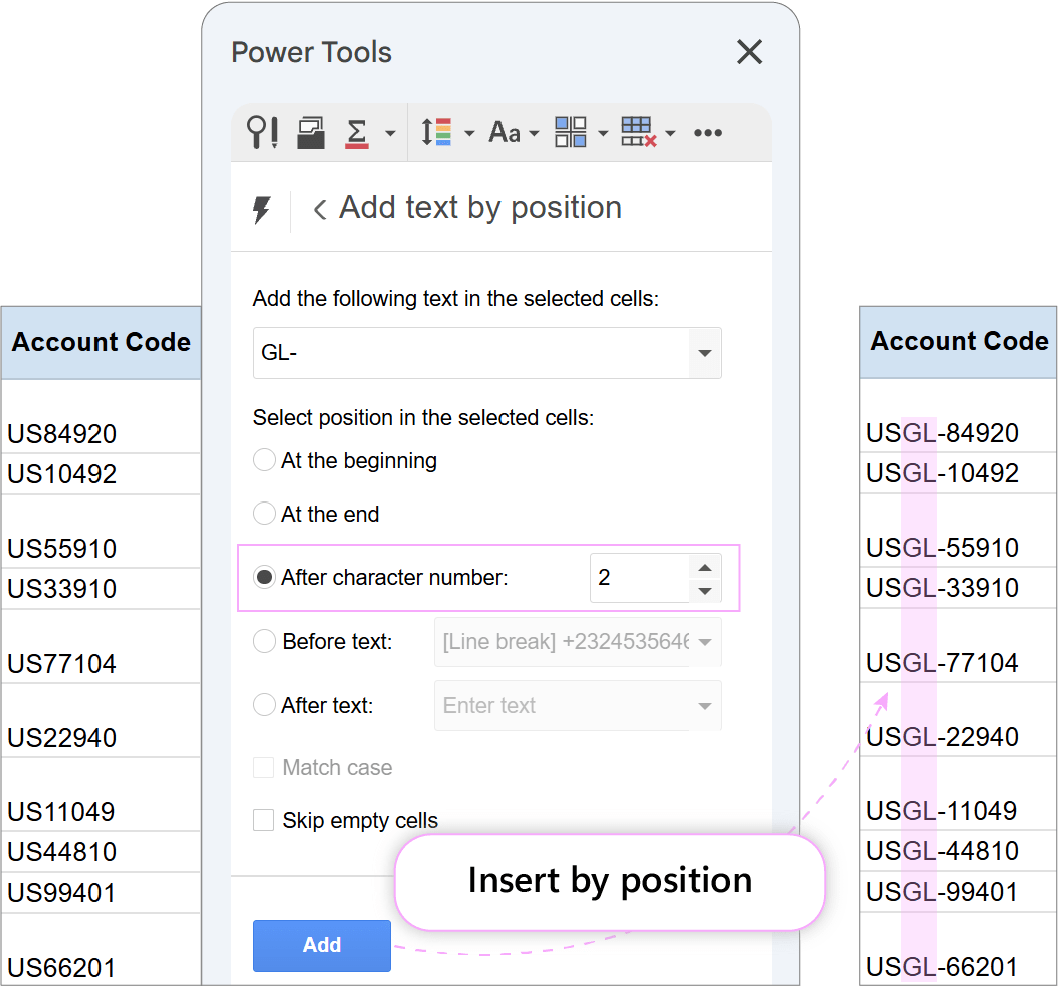
Your codes (e.g., US100293) are updated with the inserted prefix right after the second character (USGL-100293).
Step 4: Convert currency names to ISO codes
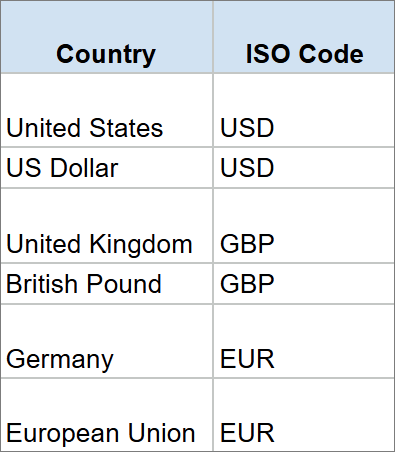
To automatically replace raw, inconsistent country and currency labels (e.g., US Dollar) with standardized 3-letter ISO codes (e.g., USD) in a single click:
- Prepare a 2-column lookup table in your sheet:
- Go to .
- Open the Replace multiple substrings tab.
- In Select the range you’d like to modify, choose your country/currency column.
- In Select the range to find & replace, select your 2-column mapping range.
- Click Run.
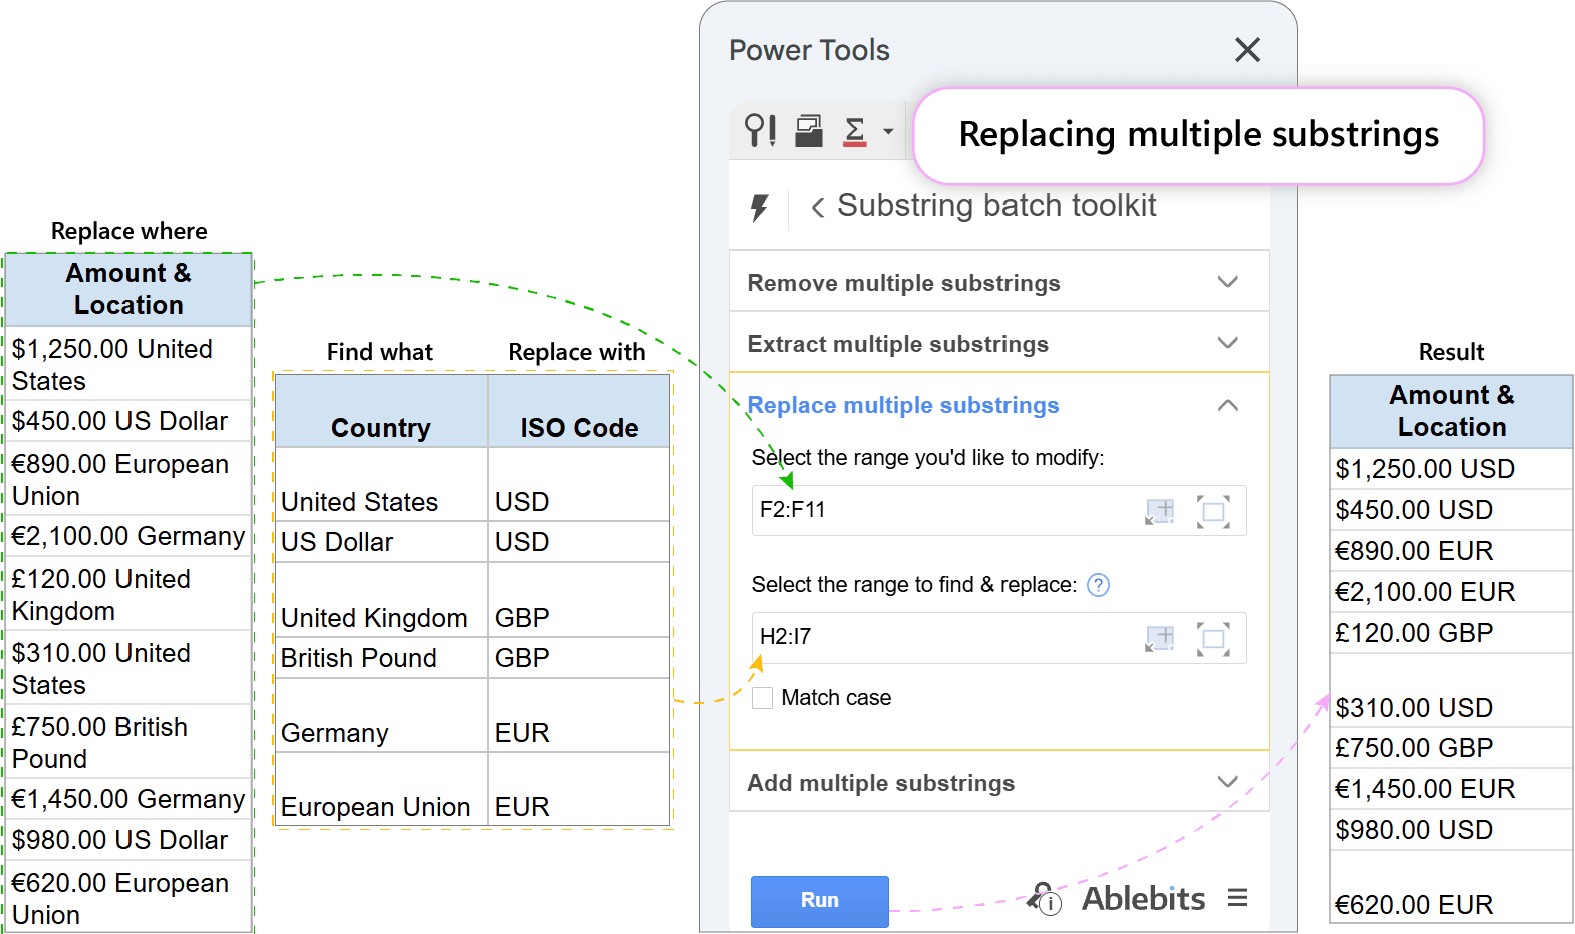
All raw location and currency variations across your dataset are converted into uniform ISO codes.
Step 5: Extract ISO currency codes into a separate column
To isolate the now standardized 3-letter currency code into its own dedicated column:
- Select the column containing the combined amount and ISO codes.
- Go to .
- Open the Extract the first/last N characters group.
- Select Extract the last and enter
3in the chars field. - Check Insert new column with results to the right.
- Click Extract.
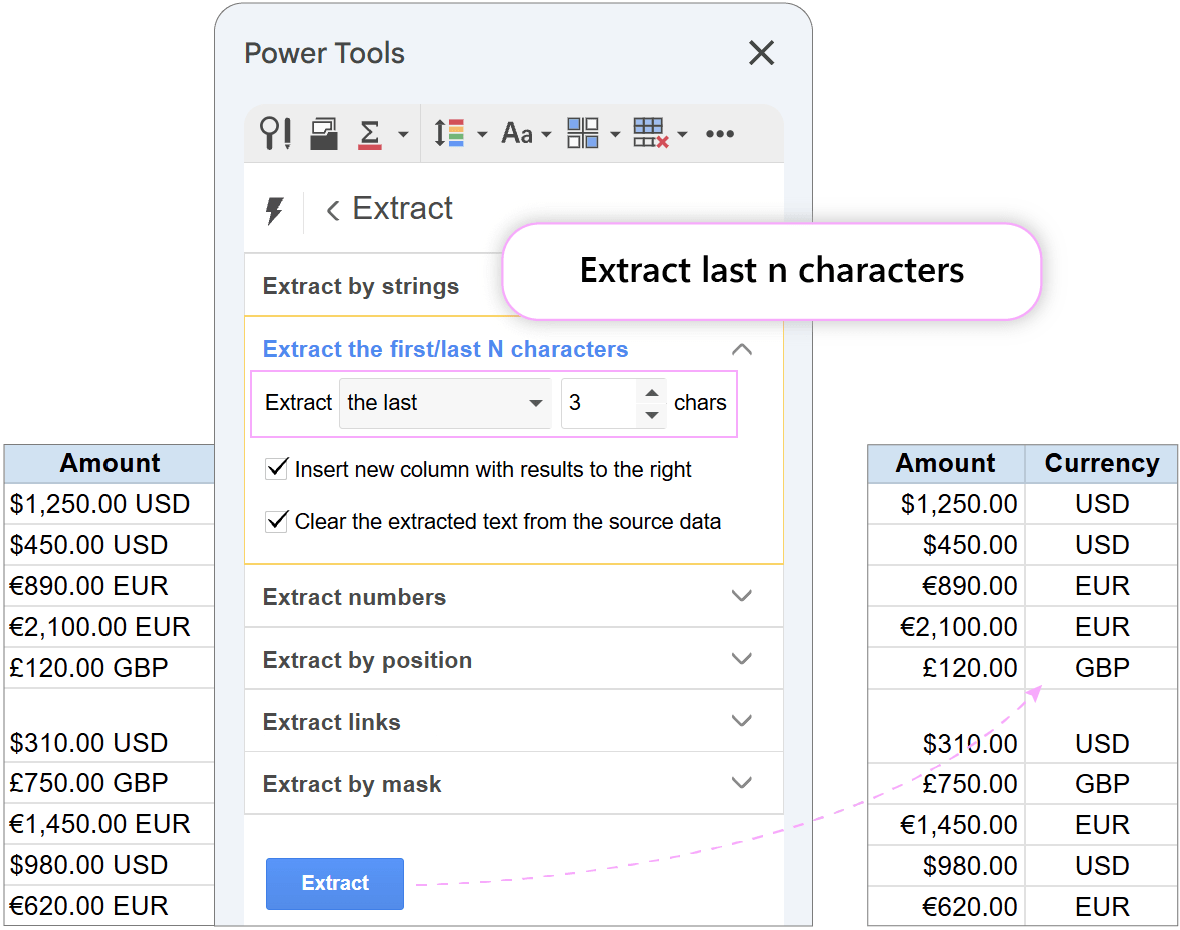
A column containing only the ISO code appears right next to your original amounts.
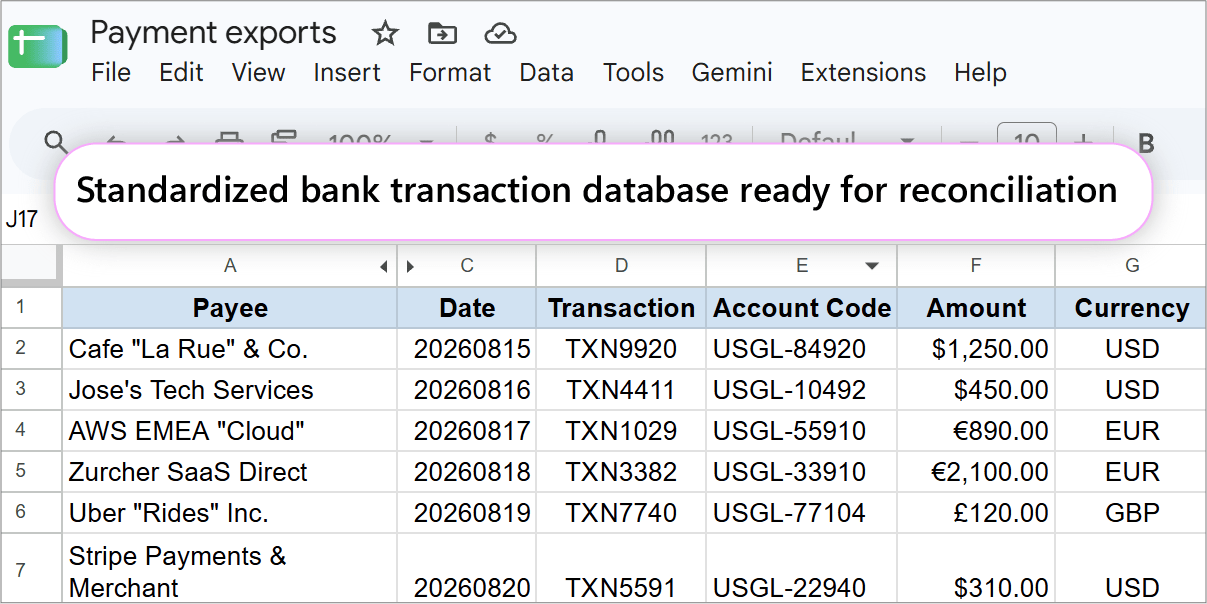
As you can see, with Power Tools it’s easy to standardize transaction databases for reconciliation or import into your accounting system.
FAQ
How do I extract hyperlinks without writing formulas?
Use . Select Extract links > Extract hyperlinks, and click Extract.
Can I remove invisible spaces and HTML codes from Google Sheets data?
Yes. Go to and open the Remove spaces and delimiters section. Check Remove leading and trailing spaces, Remove html entities, Remove html tags, and Remove non-printing characters, then click Remove.
How do I replace multiple different text values in Google Sheets all at once?
Use the Substring batch toolkit inside Power Tools (). Create a 2-column range (one column for text to find and one for replacements) and run the tool to replace all matching substrings.
Is Power Tools safe for sensitive financial and CRM data?
Yes. Power Tools runs locally within your Google Sheets environment. Your spreadsheet data is never sent to, stored on, or analyzed by external servers.
